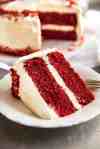
Red Velvet Cake
Recipe VIDEO above. The classic, iconic Red Velvet Cake! The sponge is soft and velvety, true to it's name, with a buttery flavour, moist with a hint of chocolate, vanilla and tang from buttermilk. MEASURES: Don't switch between weights/ml and cups in the recipe, read note 11. UK: Please read notes 7 and 9. After Red Velvet Cupcakes? Here's the recipe!
Servings: 10 -12
Ingredients
Dry Ingredients
- 2 2/3 cups (400 g) plain cake flour (Note 1)
- 2 tbsp (10 g) cocoa powder , unsweetened
- 1 tsp (5 g) baking soda / bi-carb soda , NOT baking powder (Note 2)
- Pinch of salt
Wet Ingredients
- 1/2 cup (115 g) unsalted butter , softened (1 US stick)
- 1 1/2 cups (330 g) caster / superfine white sugar (Note 3a)
- 2 eggs , at room temperature (around 2 oz / 60g each)
- 1 cup (250ml) vegetable oil
- 1 tsp white vinegar
- 2 tsp vanilla extract (or essence)
- 1 cup (250 ml) buttermilk , at room temperature (Note 4)
- 2 1/2 tbsp red food colouring liquid (UK: use Gel, Note 7)
Frosting (Note 10)
- 14 oz (400 g) Philadelphia Cream Cheese, block , softened but not too soft (UK see Note 9)
- 1/2 cup (115 g) unsalted butter , softened (but not too soft)
- 1 1/2 tsp vanilla extract
- 4 cups (450 g) soft icing sugar / powdered sugar sifted (Note 3b)
Instructions
- Preheat oven to 180C/350F (all oven types). Butter 2 x 21cm / 8" round cake pans (sides and base) and dust with cocoa powder.
- Sift the Dry Ingredients and whisk to combine in a bowl.
- Place butter and sugar in a bowl and beat with electric beater or in stand mixer until smooth and well combined (use paddle attachment if using stand mixer).
- Add eggs, one at a time, beating in between to combine. At first it will look curdle - keep beating until it's smooth.
- Add vegetable oil, vinegar, vanilla, buttermilk and red food colouring. Beat until combined and smooth (Note 5).
- Add Dry Ingredients. Beat until just combined - some small lumps is ok, that's better than over mixing.
- Divide batter between cake pans. Bake for 25 - 30 minutes on the same shelf, or until a toothpick inserted into the centre comes out clean. (Note 6)
- Rest for 10 minutes in the pan then turn out onto a cooling rack and allow to cool.
Frosting
- Beat together cream cheese, butter and vanilla for 3 minutes (this makes it really smooth and changes from yellow to almost white). Add icing sugar and beat for 2 minutes or until frosting is light and fluffy to your taste. If your frosting seems too runny (depends on quality of cream cheese/ if the cream cheese was too soft), just add more icing sugar.
Frost Cake
- Cut the top off the cake using a serrated knife (to make the layers neat).
- Spread one cake with 1 1/2 cups of frosting. Top with the other cake. Spread top and sides with remaining frosting.
- Optional: Crumble offcuts and use to decorate the top rim and base of the cake.
Notes
1. Cake flour is lighter and has a lower protein content that all purpose / plain flour. It produces cakes with a very soft crumble and minimal "bounciness", like what you get from posh bakeries.
It is not readily available in all countries, though it can be found in Australia in supermarkets (Coles, Woolworths).
SUBSTITUTION - If you can't find cake flour, substitute as follows: Measure out 2 2/3 cups / 400 g plain (all purpose) flour into a bowl. Remove 5 tbsp / 60g plain flour, then add 5 tbsp / 60g of cornstarch / cornflour.
CAN'T USE CAKE FLOUR? This recipe will work just fine if you make this with just all purpose / plain flour. The cake just won't be quite as tender. :-) Still delicious though!
2. Baking Soda is also called bi-carb soda. It works like baking powder but it is 3 times stronger. It needs acid to activate it (buttermilk in this recipe). It cannot be substituted with baking powder in this recipe.
3a. Sugar - Normal white sugar will also work just fine, it is just that caster sugar blends in easier, faster and better. :-)
3b. Icing sugar - For Australians reading this, either soft or pure icing sugar will work here. I usually use soft because it's a pantry staple and less sifting required!
4. Buttermilk - for most baking recipes, buttermilk can be substituted with milk + lemon juice left to curdle. But for this recipe, it does not work quite as well so please use buttermilk if you can!
5. Batter - Don't worry if it separates slightly because of the oil, it will come together when the flour is added.
6. CAKE SIZE: This can be made in one cake pan (but 2 cake pans is better/easier). Just pour batter into one cake pan and bake for around 45 minutes in total, maybe even 1 hour, but you must cover with FOIL at around 30 minutes, otherwise the top may get too brown. Use a skewer to test if the inside is baked. Then cut cake in half.
CUPCAKES: This makes 22 standard cupcakes. Divide between paper patty lined muffin tins. Bake 25 minutes or until skewer comes out clean.
7. If you are in the UK, please use GEL not liquid food colouring. The liquid colouring sold in the UK tends to be natural rather than artificial so it is not as intense as the liquid colouring we have here in Australia and the US. So to achieve the intense bright red colour, you will need to use gel.
8. OIL SPLITTING: A few readers had a problem where the base of the cake was oily once removed from the pan. To ensure this does not happen, ensure the batter is beaten well after each ingredient is added. See video for how the batter should look.
9. Philadelphia Cream Cheese in the UK is softer than what we have here in Australia (and in the US, Canada). In the UK, it has a lower fat % and comes in tubs, and it's spreadable. We also have Philly that comes in tubs that are specifically made to be spreadable. This recipe calls for Philadelphia cream cheese that comes in blocks and is firmer. If you are in the UK, get 2 x 180g Original Philadelphia cream cheese and start with just 250g instead of the 400g called for in the recipe. After beating, if your frosting consistency is soft / fluffy but still holds its shape, add more (for more cream cheese flavour). Also, ensure your butter is softened but NOT super soft, that will also help. And don't worry, even if you used 250g, the frosting still tastes like cream cheese frosting!
10. Frosting too runny - Frosting should be soft and fluffy, but spreadable able to hold it's form if piped. Ensure the butter and cream cheese are just soft enough to whip smooth, but not extremely soft (eg left out on hot summer day). If your frosting is too runny, refrigerate for 15 to 30 minutes, then beat again to fluff up. Or add more icing sugar.
11. Constant measures - Do not switch between grams/ml and cups. So if you weigh your flour, then use only the weights and ml measures for each ingredient, where provided (but use tsp or tbsp where ml is not provided). But if you measure flour using cups, then you must use cups for ALL ingredients. Reason: cup sizes vary slightly between countries. So if you switch between grams and cups, the recipe may be adversely affected. So to be sure this works, stick to either grams & ml, OR cups. I've personally specifically tested this recipe using both methods and had someone else test it too, and it works 100% both ways.