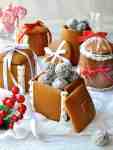
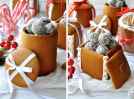
Gingerbread Boxes & Mason Jars
Gingerbread Cookies transformed into mason jars and boxes! No cookie cutter, mixer or any other special equipment required to make these. Fill with goodies for a completely edible homemade gift! Tip: The Mason Jars are easier to make because they don't require constructing! This recipe makes either 2 boxes or 2 mason jars. Please note: The gingerbread recipe used in this recipe is specific for this recipe. It is lighter than most gingerbread recipes (less butter, honey instead of molasses or golden syrup) so the Mason Jar doesn't slide down the can while baking (which is what happens if you use a gingerbread recipe with more butter in it). For Gingerbread Men and Cookies, use this Gingerbread Men recipe.
Servings: 2 Boxes or Mason Jars
Calories: 198cal
Ingredients
Gingerbread
- 50 g / 1.8 oz unsalted butter , chopped
- 1/2 cup firmly packed brown sugar
- 1/2 cup honey
- 1 egg , lightly whisked
- 2 1/2 cups plain flour
- 1 tsp baking powder
- 1 tsp bicarbonate of soda
- 1 1/2 tsp ground ginger
- 1 1/2 tsp ground cinnamon
- 1/2 tsp All Spice (or ground cloves)
To Construct Boxes
- 1 cup milk chocolate buttons
Royal Icing (Optional for decorating)
- 1 egg , white only
- 2 cups sifted icing sugar (confectioner's sugar)
Decorations (Optional)
- Silver Sugar Balls
Equipment Required for Mason Jars
- 2 x empty 400g /14oz cans , washed and labels removed (e.g. canned tomatoes)
Instructions
- Place butter, brown sugar and honey in a small saucepan over low heat. Stir until the butter is melted and sugar is dissolved. Set aside until almost at room temperature. (Note 1)
- Pour into a large bowl and add the egg. Mix until combined.
- Sift the remaining Gingerbread ingredients straight into the bowl. Mix until just combined, then use your hands to knead it a few times in the bowl to bring the dough together. (Or turn onto work surface if your bowl isn't large enough).
- Flatten dough into a disc, wrap in cling wrap and place in the fridge for 1 1/2 hours. (Note 2)
- Remove dough from fridge. For ease of handling, cut the dough into 2 pieces. Use a rolling pin to roll out to 3mm / 1/ 10" thickness between two pieces of baking (parchment) paper. See Note 3 for an easy way to do this.
- Proceed with instructions to make Boxes or Mason Jars.
Preparing and Baking Boxes
- Preheat oven to 180C/350F with one oven shelf in the centre and the other directly below it.
- Line 2 baking trays with baking paper (parchment paper).
- Cut out 12 squares from the rolled out dough that are 8cm x 8 cm (3" x 3"). Place onto baking tray.
- Optional: Cut 2 x small squares to use as the "knob" in the centre of the lid. Place small squares in the centre of 2 squares.
- Bake for 12 to 15 minutes until golden brown. The top tray will take around 12 minutes, the bottom tray will be closer to 15 minutes (move it to the upper shelf when you take out the first tray).
- Allow to stand for 5 minutes on the tray then remove onto cooling racks.
Constructing Boxes
- Once the squares are cool, select 8 squares to be the walls of the boxes and line them up in front of you with the flat side down on the bench (i.e. the side that was on the baking tray).
- Use a knife to trim the bottom and right side of each square (to make the edges flat - easier to construct).
- Melt the milk chocolate buttons.
- Use a knife to spread melted chocolate on the right edge (that you trimmed) of one square (Square A). Hold Square A standing upright so the bottom edge (that you trimmed) is flat on the work surface.
- Get another square (Square B) and hold it upright so the bottom trimmed edge is on the work surface. Attach the chocolate edge of Square A to the flat side of Square B (i.e. the side that was on the baking tray). Hold for 20 seconds to let the chocolate firm up a bit.
- On Square B, use a knife to spread melted chocolate on the right edge you trimmed. Then attach that to another square, then repeat until you have constructed the walls of a box. Repeat for other box.
- While the walls are setting, get two more squares. Trim them with a knife so they are the right size to fit inside the walls - this will be the Base of the box. Spread a little chocolate on the edges of the square then pick up the walls and put it over the Base and push down so the Base fits inside the walls.
- Use Royal Icing to hide the edges and decorations of choice. I used Silver Sugar Balls. Attach the decorations while the Royal Icing is wet.

Prepare Mason Jars
- Line 1 baking tray with baking paper (parchment paper).
- Press the open end of the can into the dough to cut out 2 rounds. These will be the base.
- Cut 2 x strips of baking paper that are at least the height of the can and are long enough so it will overlap when you wrap the can. Butter the baking paper then wrap around the cans.
- For cutting the dough: Cut a rectangle out of baking paper that is the height of the can and the length to wrap around the can with a 1 inch / 2cm overlap. **This is important. See Note 4.**
- Lay the rectangle from step 4 on the dough and use a large knife to cut out the rectangle. Repeat to make two rectangles.
- Leaving the dough on the baking paper it was rolled out on, place the can on one end of the dough and roll up firmly to cover the can. Make sure it wraps snugly, saggy dough will result in a saggy Mason Jar. Remove parchment paper, trim any excess dough and use your fingers to seal. Repeat with other can. Place the cans on their side on the baking tray, seam side down.
- Gather up the dough remnants and roll out again. Place one can with the dough wrapped around it upright onto the dough and use a small knife to cut out rounds. Repeat to make 2 rounds. These will be the lids. Place onto baking tray.
- Optional: Cut a small square and place in the centre of the lids. (I forgot to do this and had to stick on a cooked piece of gingerbread!)
- Place baking tray in the fridge with the cans on their side for 30 minutes. This helps stop the mason jars from sliding down when baking.
Baking Mason Jars
- Preheat oven to 180C/350F. Put the oven shelf in the middle of your oven (note 5).
- Remove the baking tray from the fridge. If the dough on the cans has sagged slightly, use your hands to press it against the can.
- Turn the cans upright on the baking tray and place the tray into the oven.
- Bake for 20 to 25 minutes, until golden brown, turning the tray halfway through (so the mason jar bakes an even colour).
- Remove from oven and let cool for 5 minutes before transferring to a cooling rack.
- Once cool, gently pull the can and baking paper out of the Mason Jar. It should slip out fairly easily, if not, just twist it slightly to loosen then pull out.
- Fit the small circles into the base of the Mason Jar. It might need trimming to fit - be careful not to over trim, you want it to fit snugly. You do not need anything to make it stay in place because the gingerbread is sticky and the base should fit snugly.
- Decorating is optional. With a ribbon, I don't think any decorations are required. On one, I piped Royal Icing along the bottom, top and rim with Silver Sugar Balls.

Royal Icing
- Use a mixer to beat the egg white until soft peaks form. Gradually add icing sugar, a heaped dessert spoon at a time, making sure it is incorporated before adding the next tablespoon.
- Transfer the Royal Icing into a piping bag with tip of choice.
- Use to decorate the Boxes and Mason Jar, as desired.
To Gift
- Fill with homemade (or bought) treats of choice. Mine are pictured filled with homemade Chocolate Ganache Truffles. Tie with ribbons to make them pretty!
Notes
1. Have patience and make sure the butter mixture is almost at room temperature before adding in the egg. Firstly, if the butter mixture is straight off the stove and you add the egg, you will end up with scrambled eggs in your gingerbread. Secondly, if the butter mixture is still warm when you mix the dough, the dough is really sticky and hard to work with. I have experienced both these problems.
2. Don't skip the step of chilling the dough! I tried it once and the dough is impossible to work with, far too sticky.
3. I find the easiest way to roll out this dough is as follows: Place dough onto baking paper (parchment paper) and use your hands flatten and spread the dough to almost as thin as you want it. The dough is soft so it is easy to do this. Then place another piece of parchment paper on top and roll out to desired thickness. If you try to roll out a thick lump between baking paper then the baking paper crinkles and gets bunched up because it sticks to the dough which you are rolling out.
4. If you cut the dough using a piece of baking paper that is cut to shape to wrap around the can without an overlap, when you roll up the can in the dough, it won't be long enough. I won't go into technicalities, but just trust me, make the rectangle extra long. It's easy to trim excess but a pain to fill the space if you are short.
5. You need the oven shelf to be at a height so when you put the tray in, the top of the mason jars will fit without touching the top of the oven.
6. The gingerbread recipe plus the step of chilling the dough again once it is rolled up on the can are specifically to help ensure the Mason Jar maintains its form while baking, instead of sliding down the can (causing the bottom of the Mason Jar to be wider than the top). However, if your Mason Jar does lose its shape while baking, you can balance it out visually by either piping a rim of Royal Icing along the top rim or wrapping a ribbon around the top.
Another thing I did was to use leftover dough to make a mug handle which I glued onto the side of the "mug" (using melted chocolates) and I filled the mug with a sachet of hot chocolate powder and marshmallows. That was quite fun too!
7. Nutrition assumes 12 servings (being one Gingerbread Box piece each!).
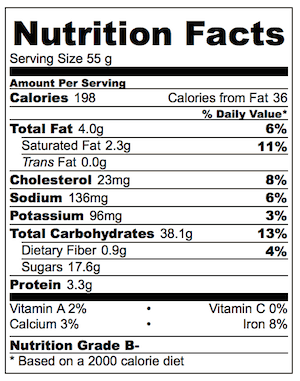
Nutrition
Serving: 55g | Calories: 198cal | Carbohydrates: 38.1g | Protein: 3.3g | Fat: 4g | Saturated Fat: 2.3g | Cholesterol: 23mg | Sodium: 136mg | Potassium: 96mg | Fiber: 0.9g | Sugar: 17.6g | Vitamin A: 100IU | Calcium: 30mg | Iron: 1.4mg