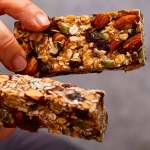
Chewy muesli bars (granola bars)
Recipe video above. These are chewy, no-bake muesli bars that will keep for 2 weeks. Cheaper, tastier and much healthier than store-bought, it's also an excellent way to clear out random leftover nuts and dried fruit. Just stick to the recipe ratio of "glue" to add-ins (3 1/2 cups total). My combination is a dead-ringer for Australia's popular Carmen's Classic Fruit & Nut Muesli Bars (which cost $6.50 for 6!).After crunchy muesli bars? Here they are!
Servings: 10
Calories: 309cal
Ingredients
- 1/2 cup (120g) pure natural peanut butter, smooth, or other nut butter (mix oil in well, Note 1)
- 1/2 cup (175 g) honey (Note 2)
Add ins (3 1/2 cups your choice, Note 3):
- 1 1/2 cups rolled oats
- 1 cup sultanas
- 1/4 cup desiccated coconut , unsweetened
- 1/2 cup almonds , very roughly chopped
- 1/4 cup pepitas
- 2 tbsp white sesame seeds
- 1/8 tsp salt
- 1/2 tsp cinnamon
Instructions
- Mix Add-ins - Using a wooden spoon, mix the add-ins in a large microwaveable bowl (just in case, Note 4).
- Glue - Using a rubber spatula, mix the peanut butter and honey in a saucepan over medium heat until smooth. Once combined, turn the stove down to low. As soon as you start seeing little bubbles around the edges, cook for 5 minutes, stirring constantly scraping the base, until it is like a very thick caramel (see photos and video in post). You should be able to draw a path across the base and it holds before closing in on itself. DO NOT WALK AWAY, it will catch easily. (Note 5)
- Mix - Immediately pour it all over surface of the oats etc then mix with the wooden spoon. It takes a bit of effort but it does come together eventually. Stabbing and smearing against the wall of the bowl helps. If it gets too thick, microwave for 20 seconds on high to loosen the glue then mix (then it's a breeze!).
- Press - Put a square piece of paper over a 20cm/8" square tin (no need to grease). Drop muesli mix in then spread right into the corners, using a combination of your hands and the wooden spoon. Firmer press = chewier muesli bars.
- Set - Refrigerate 2 hours until firm then cut into 10 bars (cut in half, then each half into 5).
Notes
PRO TIP: Good recipe to use your scales. Measuring honey and peanut butter in cups is a pain in the butt. For the add-ins, put your bowl on the scales and just keep adding to it!
1. Use natural peanut butter which is just 100% peanuts, no salt, no sugar, stabilisers, preservatives etc added, unlike commercial spread. Runnier with a stronger peanut flavour (hence why it's a must for satay sauce!), and better for you.
Oil and peanut tend to separate if left in pantry for ages so mix until combined before using. Try microwaving (no lid!) to warm then mixing with chopstick or knife. Failing that, scrape everything in a narrow jug and blitz with stick blender.
Non-peanut substitute - I think almond butter is best, for flavour and texture. I've read in other granola bar recipes that other nut butters work too.
2. Maple syrup should also work, just make sure it cooks down to the same consistency shown in the recipe video.
3. Add ins: use 3 1/2 cups in total of whatever you want, though I recommend at least 1 cup of oats for substance.
4. Use a microwavable bowl just in case. Why? The glue is quite thick and can be hard to mix in. If it sets a little too much mid-stir, a quick 15 second microwave loosens the glue up again and makes it much easier to mix in. Trust me, I learnt the hard way when I took a call from a friend mid-stir.
5. The glue - The thicker the glue when it comes off the stove, the stronger the bind, the chewier your muesli bars. If you don't cook it down, the glue won't be as strong. Your muesli bars will hold together fine but will lack the desirable CHEW!
6. Storage - Keeps for at least 2 weeks in the fridge in an airtight container. They are very hard & chewy when cold so bring to room temp (unless you want some serious chew!).
7. Nutrition per museli bar. One bar is a good breakfast on the run!
Nutrition
Calories: 309cal | Carbohydrates: 43g | Protein: 8g | Fat: 14g | Saturated Fat: 3g | Polyunsaturated Fat: 4g | Monounsaturated Fat: 6g | Trans Fat: 0.002g | Sodium: 38mg | Potassium: 344mg | Fiber: 5g | Sugar: 16g | Vitamin A: 1IU | Vitamin C: 1mg | Calcium: 57mg | Iron: 2mg