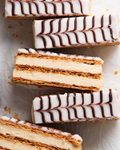
Mille-Feuille
Recipe video above. This is JB's recipe for a real Mille-Feuille, made the proper French patisserie way with thick layers of custard rather than little blobs sandwiched between puff pastry. It's just not the same!It takes time to make but don't be intimated, we'll lead you through it step by step. There's nothing here that a home cook can't do, no speciality ingredients or equipment required. Truly great Mille-Feuille is so rare outside France, it really is worth making yourself. And imagine the bragging rights!
Servings: 6 slices (4 x 12.5cm / 2.6 x 5")
Calories: 704cal
Ingredients
For puff pastry layers
- 2 sheets frozen butter puff pastry , 25cm / 10" squares (185g/6oz each), just thawed (Note 1)
- 1 1/2 tbsp soft icing sugar / powdered sugar
Vanilla custard (pastry cream / diplomat cream)
- 1 cup full fat milk (low-fat works too)
- 1/2 cup thickened cream / heavy cream , or other whipping cream
- 1 vanilla bean , split lengthways and seeds scraped out, or 1 tsp vanilla bean paste (Note 2)
- 3 egg yolks from large eggs (50 - 55g/2oz each in shell) - see here for using egg whites
- 1/2 cup caster sugar / superfine sugar , substitute regular / granulated white sugar
- 1/3 cup cornflour / cornstarch
- 1 tbsp plain flour / all-purpose flour
- 1 tbsp / 15g unsalted butter , cold, cut into small 0.7cm / 1/4" cubes
To finish custard
- 3/4 cup thickened cream / heavy cream , or other whipping cream (not double cream)
- 1 tbsp gelatine powder (Note 3)
- 3 tbsp water , just cold tap water
Mille-Feuille Decorative Icing
- 1 cup soft icing sugar / powdered sugar , sifted
- 4 tsp full fat milk (low-fat works too)
- 3/4 tsp vanilla extract
- 2 tbsp dark chocolate chips / US: semi-sweet chips (Note 4)
Instructions
ABBREVIATED RECIPE
- Bake puff pastry pressed between sheets. Spread with vanilla icing, pipe chocolate lines then use a toothpick to make the Mille Feuille pattern. Make custard the usual way - it is extra thick. Cool then incorporate gelatine and whipped cream - the whipped cream lightens it and the gelatine makes the Mille Feuille sliceable. Pipe between puff pastry layers, chill 6 hours to properly set before slicing.
FULL RECIPE
Puff Pastry Layers
- Preheat oven to 180°C / 390°F (160°C fan-forced).
- Cut each pastry sheet in half, you’ll use 3 halves and pop the 4th back in the freezer for another day.
- Prick and dust - Turn 2 baking trays upside down and cover with a sheet of baking paper / parchment paper (Note 5). Place one puff pastry sheet on one tray and two on the other, spaced out as much as you can. Prick all over with a fork (about 30 pricks on each piece). Dust all over with icing sugar using a sifter.
- Weigh down - Cover each pastry with another sheet of baking paper / parchment paper and place another tray on top to keep them from puffing up as they bake.
- Bake 30 minutes, swapping and turning the trays halfway through, until deep golden and crisp. (The one with 2 sheets on it might take a few extra minutes). Place them on a wire rack and cool completely.
- Trim each puff pastry sheets to make them all the same size using a sharp serrated knife. You can either use a ruler or stack them, using one as the master template.
Vanilla Custard Filling (Pastry Cream)
- Infuse milk - Put the milk, cream, vanilla bean seeds and used vanilla bean into a large saucepan (~20 cm/8" wide). Heat over medium heat until just below boiling. Remove from heat, cover, and let sit 10 minutes to steep.
- Whisk yolks - In a medium size bowl, whisk egg yolks and sugar. It will become like wet sand at first, then will turn liquidy and smooth. Add cornflour and flour, whisk until smooth - it will be like a thick cake batter.
- Remove vanilla bean from the milk and use your fingers to squeeze all the milk out into the saucepan. Discard used bean.
- Temper eggs - While whisking constantly, slowly pour half the vanilla milk mixture into the yolk bowl. Once combined, pour the mixture into the saucepan with the remaining milk and whisk to combine.
- Thicken custard - Return the saucepan on medium heat (or medium low if you have a strong burner). Whisk constantly - leisurely at first, then more briskly as the mixture starts to heat up at which point it will start to thicken into a thick custard - around 7 to 10 minutes, even longer if using a very low heat to be safe. If you see lumps like scrambled eggs, move it off the heat straight away and whisk them out vigorously until smooth then return to the stove.
- Custard goal thickness - The custard is ready when it is very thick dolloping consistency (see video at 2.20 minutes). You should be able to draw a path across the base of the pan and the pan base stays visible. This custard is thicker than usual so you cannot rely on the "bubble" test.
- Finish - Remove from the stove. Whisk in the cold butter cubes until incorporated (the butter must be cold, not room temperature else custard may split). Immediately pour into a large bowl, smooth surface, then cover with cling wrap touching the surface to prevent a skin from forming.
- Cool on the counter for 30 minutes, then refrigerate for 45 minutes or until it is cool and firms up to a soft rubber-like consistency. (You can even leave it overnight).
Vanilla & Chocolate Icing
- Vanilla icing - In a small bowl, whisk icing sugar, vanilla, and milk until smooth. (Don't make this ahead as it will crust over).
- Melted chocolate - Place the chocolate chips in a microwave-safe bowl and melt over (3 × 20-second microwave bursts), stirring between each. Transfer to a small piping bag or zip-lock bag. Snip a 2 mm hole (1/6"). (Only melt chocolate just prior to using to ensure it remains fluid).
- Mille Feuille icing pattern (see video at 3.58 minutes and step photos) - Place one piece of puff pastry on a rack set on a tray (to catch drips). Spread evenly with the vanilla icing. Pipe on thin lines of the chocolate icing lengthways, making the lines 1 cm / 0.4" apart. Working quickly before the chocolate sets, use a toothpick to drag through the lines (1.5 cm / 0.6" apart), alternating one way and then the other, to make the classic mille-feuille pattern.
- Fridge 30 minutes - Place in the fridge for at least 30 minutes to let it set. It can stay for longer, until you're ready to assemble.
Turn Pastry Cream into Diplomate Cream
- Bloom gelatine - Place the cold water in a small heatproof bowl and sprinkle the gelatine evenly over the surface. Whisk to combine, then leave for 3 minutes until firm and rubbery (this is called "blooming"). Microwave for 15 seconds until melted (do not boil), then cool for 5 minutes.
- Loosen custard - Remove the chilled custard from the fridge, it will have firmed up into a soft rubber. Then use a rubber spatula to soften the custard as best you can, I just sort of smear it. It won't become soft creamy, it will be like a soft mushy paste.
- Combine custard and gelatine - Transfer a 1/4 of the custard into a large saucepan (~20 cm/8" wide) and warm it over low heat, whisking, until it softens a bit more. It won't become fluid but it will be a very soft paste. Still on the stove, add gelatine and whisk until smooth, it will be like a thick batter consistency. Whisk in another 1/4 of the custard until smooth, then remove from the stove and pour that mixture into the custard bowl. Whisk vigorously until smooth. Set aside to cool slightly while you whip the cream.
- Whisk in whipped cream - Beat the cream using an electric beater or stand mixer fitted with the whisk attachment until stiff peaks form (upright peaks). Put a quarter of the cream into the custard, then beat it in with the electric beater. Add remaining cream then beat again until smooth. Congratulations, you've made diplomate cream!
- Fridge 20 min only - Cover the bowl and refrigerate for 20 minutes so it firms up enough to pipe, but still creamy enough to scoop. Do not refrigerate longer else the gelatine will make the custard set. If you accidentally do this, gently warm to soften then refrigerate again.
Assemble the Mille-feuille
- Beat smooth - Remove the diplomate cream from the fridge. It will be like a block of soft rubber. Using an electric beater, beat on high for 30 seconds or until the custard is loosened and smooth. Transfer half the custard into a large piping bag and snip the tip of the bag so you have a 1cm / 0.4" round hole (or use a round nozzle).
- Layer 1 - Place one cooked pastry sheet on a cutting board. Pipe lengthways on the pastry sheet - I do 6 rows - to cover all the pastry with diplomate cream, aiming to use all the diplomate cream. Dip an offset spatula in warm water then gently smooth the top.
- Layer 2 - Place the second pastry sheet on top, press lightly. Fill the piping bag with the remaining diplomate cream and repeat the piping. Smooth the top again.
- Layer 3 - Gently place the iced pastry on top, icing facing up. Use any leftover diplomate cream to pipe along the short edges to fill any gaps in the custard and use the offset spatula to smooth it.
- Chill - Refrigerate at least 6 hours to set (I usually refrigerate overnight, to be sure).
- Slice - Use a sharp serrated knife to cut into 6 pieces, wiping the blade between each slice. If you can, wait another 30 minutes before eating as the custard is even nicer if it's not fridge-cold!
Notes
1. Frozen puff pastry in Australia sold in grocery stores comes in 25cm/10" squares, which is what this recipe is based around. Use butter puff pastry rather than puff pastry made with oil, it tastes better. The front of the packet will say it's made with butter, it costs a little more.
2. Vanilla - Use a vanilla bean if you can, else vanilla bean paste so you still get the lovely little specks. Else, use 1 teaspoon of vanilla extract. I’d avoid imitation vanilla essence - for all this effort, Mille-Feuille deserves proper vanilla!
3. Gelatine is the secret ingredient to set the vanilla custard so it's firm enough to slice neatly into classic Mille-Feuille slices, yet it still has that lovely soft, creamy texture when you eat it that melts in your mouth. Recipes that don't use gelatine have to pipe the custard in blobs between the pastry instead, because the custard is too soft to assemble as a large slab then cut into the neat slices you see in pâtisseries.
4. Melted chocolate - You won't use it all but it's tricky to melt less as it's prone to burning. Mix leftover into warm milk and sip a hot chocolate as you cook!
5. Baking the compressed puff pastry - The baking tray is flipped upside down so the puff pastry is pressed properly flat when the 2nd tray is placed on top (ie the tray rims do not get in the way).
If you only have 2 trays, bake the puff pastry in batches.
Leftovers and storage - Best on the day it’s made, the pastry stays crisp, and the cream holds perfectly. Still really great the day after, though the pastry will soften slightly. Store leftovers covered in the fridge up to 3 days.
Nutrition per serving.
Nutrition
Calories: 704cal | Carbohydrates: 73g | Protein: 10g | Fat: 42g | Saturated Fat: 20g | Polyunsaturated Fat: 4g | Monounsaturated Fat: 16g | Trans Fat: 0.1g | Cholesterol: 164mg | Sodium: 159mg | Potassium: 171mg | Fiber: 1g | Sugar: 43g | Vitamin A: 993IU | Vitamin C: 0.3mg | Calcium: 113mg | Iron: 2mg