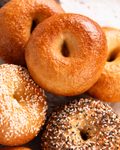
Bagels
Recipe video above. This is a recipe for truly exceptional New York-style bagels from our very own Stephen, head chef at RecipeTin Meals and resident bread expert, developed in collaboration with JB. Great not just by homemade standards, but by any standards - incredible chew, thin crisp crust, deeply bronzed and shiny, with that signature dense-but-never-dry crumb. Oh boy!Cold-proof overnight in the fridge for true New York-style with blistering and flavour development. But even the "bake now" option is better than any bagel I've had here in Sydney.
Servings: 8 bagels
Calories: 252cal
Ingredients
Bagel dough:
- 4 1/4 cups bread flour , white (Note 1)
- 1 1/2 cups tap water , warm (not hot)
- 1 3/4 tsp (6 g) instant yeast / rapid rise yeast (check it's still alive, Note 2 - also see Note 2 about active dry yeast)
- 2 tbsp (25 g) white sugar (any type - caster or regular)
- 2 3/4 tsp (15 g) cooking salt / kosher salt (if measuring with teaspoons, halve for table salt, +50% for salt flakes)
For poaching bagels:
- 2 litres / 2 quarts water
- 3 tbsp honey (Note 3)
- 1 3/4 tsp (10 g) baking soda (bicarbonate of soda) (Note 3)
Bagel toppings (optional)
- 1 egg white , at room temperature (from large egg 55 – 60g / 2 oz each)
- 1/2 tsp water
- Everything Bagel Seasoning (1 full batch will top 8 bagels, 1 1/2 tsp per bagel)
- 12 tsp white sesame seeds (1 1/2 tsp per bagel)
- 8 tsp poppyseeds (1 tsp per bagel)
Instructions
ABBREVIATED RECIPE
- Mix dough ingredients until incorporated. Rest 20 min, knead until smooth, proof 1 - 1.5 hrs 75% increase. Divide into 8 balls, rest 10 min. Form bagel shape, proof 30 min (30% rise) or fridge 24 hrs (15 - 20% rise). Poach 1 min each side, brush with egg wash and sprinkle toppings (if using), bake 20 min at 220°C/425°F (200°C fan).
FULL RECIPE
Make bagel dough:
- Mix - Put all the dough ingredients in the bowl of a stand mixer and mix on low speed using the hook attachment until you can no longer see flour - about 1 minute.
- Rest - Cover the bowl with a damp tea towel, and leave the dough for 20 minutes to rest.
- Knead - Still using the stand mixer with the hook, knead the dough for 8–10 minutes on low speed (speed 2 of 10 for a KitchenAid) until smooth and elastic. It should pass the "window pane" test (see video at 42 sec). Or you can do this by hand (15 - 20 minutes).
- Oil bowl - Remove the dough so you can lightly spray the bowl with oil, then put the dough back in. Cover with a damp tea towel.
- Dough proofing #1 - Put the bowl in a warm place (Note 4) and let it rise for 1 to 1.5 hours or until it has increased by 75% (not doubled, that's taking it too far).
SHAPING BAGELS
- Roll into balls - Divide the dough into 8 equal pieces (125g / 4.4oz). Flatten each piece to about 2cm / 0.8" thick then gather the sides in like a money-bag to form a ball. Pinch to seal all the seams then place seam-side down and roll firmly to seal the seams (you can fix the seam as you roll if necessary). Repeat with all balls.
- Rest 10 minutes - Leave the balls on the counter and cover with a damp tea towel. Rest for 10 minutes (to relax so they can be shaped).
- Individual paper - Meanwhile, tear 8 x 15cm / 6" squares of baking paper (parchment paper) - these will be used to prevent the bagels from sticking and also for handling, to avoid accidentally squishing them. I just tear off four 15cm / 6" lengths from a standard roll, then tear each one in half.
- Bagel shape - Flatten the ball lightly into a disc ~2.5cm/1" thick. Place in your hand and pierce a hole in the middle using your thumb and index finger. Then rotate the bagel using both your index fingers to increase the hole size to 4cm (1.6").
- Place the bagel onto a sheet of paper and repeat to shape remaining bagels. Put 4 bagels each into two 23 x 33cm (9 x 13") pans or baking dishes at least 4cm / 1.6″ deep and cover with cling wrap. Or use containers with lids, as long as the bagels are 3cm / 1.2" apart.
PROOFING #2 - choose your method:
- Cooking now - Place the pans in a warm location and let them proof for 20 - 30 minutes until they increase by around 30%.
- 24 hour cold proofing - Place the pans in the refrigerator for 24 hours (20 - 26 hrs is the ideal timeframe). They will only rise by about 15 - 20%. These bagels will have sourdough-like blistering on the surface and even better flavour.
POACHING and BAKING:
- Preheat oven to 220°C/425°F (200°C fan-forced).
- Bagel poaching water - Put the water, baking soda and honey in a large pot, at least 24cm / 10" wide and bring it to a boil over high heat then lower heat to medium or medium high so it's simmering gently - the surface rippling with tiny bubbles, no giant boiling bubbles.* Don't try to get ahead and have the honey-baking soda-water mixed and sitting around waiting to boil. Mix just prior to boiling the water.
- Poach 1 minute - Using the paper to pick the bagel up, drop the bagels into the water top side down then peel the paper off, 2 bagels at a time. Poach gently for 1 minute per side using a spider or a slotted spatula to flip (water should not be foaming or bubbling - too strong!). Then remove and drain on a wire rack.(For cold-proofed bagels, poach cold, straight from fridge - don't bring to room temperature).
- Sprinkle (if using) - Lightly whisk the egg white and water together to loosen. As soon as you place the first two bagels on the rack, add the next two in the water. While they are poaching, brush the top and sides of the first two with the egg white, then sprinkle with toppings. Repeat with remaining bagels if using.
- Repeat - poach remaining bagels. (Keep moving here, minimise the time between poaching bagels and baking).
- Line 2 trays with baking paper. Place 4 bagels on each tray.
- Bake for 20 minutes, swapping the tray shelves and rotating the trays at the 10 minute mark. (I recommend checking the bagels after 15 minutes to make sure they're not browning too much.)
- Cool - Remove from the oven and transfer the bagels to a wire rack. Cool for at least 20 minutes before enjoying. That first bite of a homemade bagel is so memorable, it will be unlike anything you've ever experienced!
Notes
1. Bread flour - This higher protein flour is made for breads, it gives the bread the chew you don't get with plain flour / all-purpose flour. Especially important for bagels, to get that extra chewiness of bagels. Though this will work with plain flour (all-purpose flour) - it will look like the bagels you see - but it won't have that same chew factor (we tried it). However, it is still chewier than regular sandwich bread and to be honest, I would probably still make it!
2. Yeast - use yeast labelled “instant” or “rapid rise” which does not need to be dissolved and activated in warm water before using. Store it in the fridge to keep it fresh.
Active dry yeast - This is the yeast that needs to be activated in warm water. This bagels recipe does work with active dry yeast, it comes out exactly the same. If you have the sachets which are 7 grams each, you will need to open one and measure out 1 3/4 teaspoon (6g). Then make the recipe as follows:
If it’s coldish in your kitchen (22°C/70°F or less) OR it’s just not rising (check at 1 hour), then tuck the bowl somewhere warmer. Yeast loves warmth! But 30C/86F is getting too hot - the dough will rise too quickly and it may comprise the integrity of the crumb, causing it to collapse when baking. Best way to make ahead is to do the overnight cold proofing, so make it 20 - 26 hours before baking. Though honestly, if you make it the day before then bake for 5 - 8 minutes at 180C/350F (160C) to warm it up and crisp the crust, they are 97% like freshly made. Leftovers and storage - Bagels are at their absolute unbeatable prime straight out of the oven, great for the rest of the day, then they will keep for 3 to 4 days though I recommend sprucing them up in the oven (whole) for 5 - 8 min (180C/350F - 160C fan) or toasting (split). If you can give them a light spritz of water, even better - this will really bake them up like freshly made! They can also be frozen for 3 months. Nutrition per bagel.
- Mix the yeast with all the warm water, making sure the water is very warm, around 40°C (104°F), plus the sugar. Set aside for 5 to 10 minutes until it gets foamy across the surface. Put in the stand mixer bowl with everything else and then proceed with the recipe as written.
If it’s coldish in your kitchen (22°C/70°F or less) OR it’s just not rising (check at 1 hour), then tuck the bowl somewhere warmer. Yeast loves warmth! But 30C/86F is getting too hot - the dough will rise too quickly and it may comprise the integrity of the crumb, causing it to collapse when baking. Best way to make ahead is to do the overnight cold proofing, so make it 20 - 26 hours before baking. Though honestly, if you make it the day before then bake for 5 - 8 minutes at 180C/350F (160C) to warm it up and crisp the crust, they are 97% like freshly made. Leftovers and storage - Bagels are at their absolute unbeatable prime straight out of the oven, great for the rest of the day, then they will keep for 3 to 4 days though I recommend sprucing them up in the oven (whole) for 5 - 8 min (180C/350F - 160C fan) or toasting (split). If you can give them a light spritz of water, even better - this will really bake them up like freshly made! They can also be frozen for 3 months. Nutrition per bagel.
Nutrition
Calories: 252cal | Carbohydrates: 51g | Protein: 8g | Fat: 1g | Saturated Fat: 0.2g | Polyunsaturated Fat: 0.5g | Monounsaturated Fat: 0.1g | Sodium: 803mg | Potassium: 67mg | Fiber: 2g | Sugar: 3g | Vitamin A: 1IU | Calcium: 12mg | Iron: 1mg