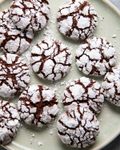
Chocolate Crinkle Cookies
Recipe video above. One of my favourite holiday cookies - everybody loves those dramatic chocolate cracks against the snowy white coating! This recipe is based on my brownie batter so they're extra fudgy and chocolatey because we use both melted chocolate and cocoa powder. Ordinarily, only cocoa powder is used. Meanwhile, the outside is crisp with impressive cracks, and that all-important snowy white coating that stays white thanks to a double-sugar coating, rolling the balls in sugar first to create a barrier then icing sugar. Trick I picked up from the clever folks over at Cooks' Illustrated! Gluten-free - Recipe works great with gluten-free flour! See FAQ for more information.
Servings: 22 cookies, 6.5cm / 2.5" wide, 2.25cm / 0.9" high
Calories: 132cal
Ingredients
- 200g/ 6.5oz dark chocolate chips or discs/melts (US: semi-sweet chocolate) - Note 1
- 60g (4 tbsp) unsalted butter , melted and cooled
- 2 large eggs , at room temperature (50 - 55g/2oz each, no larger)
- 1/4 cup white sugar / granulated sugar (or caster sugar / superfine sugar)
- 1/4 cup (tightly packed) brown sugar
- 1 tsp vanilla extract
- 1/4 cup unsweetened cocoa , sifted (not Dutch processed) - Note 1
- 1 cup plain flour / all-purpose flour
- 1 1/2 tsp baking powder (make sure yours is still alive), don't substitute with baking soda
- 1/8 tsp cooking salt / kosher salt
Dusting:
- 1/4 cup white sugar / granulated sugar (not caster sugar / superfine, it's too fine)
- 3/4 cup icing sugar / powdered sugar , no need to sift
Instructions
ABBREVIATED RECIPE:
- Melt chocolate, cool 5 min. Add Wet ingredients, whisk well. Stir in Dry ingredients with wooden spoon. Fridge 30 min. Roll 20 - 22 x 1.5 tbsp balls, roll in sugar then pack on icing sugar thickly - only do what fits on the trays. Bake 13 min 180°C/350°F (160°C fan).
FULL RECIPE:
Make cookie dough:
- Mix dry ingredients - Whisk the cocoa powder, flour, baking powder and salt together in a medium bowl. Set aside.
- Melt chocolate - Place the chocolate in a large heatproof bowl. Microwave in 20-second increments, stirring between each, until melted and smooth. Leave to cool for 5 minutes.
- Make cookie dough - Add the butter, eggs, both sugars and vanilla to the melted chocolate. Whisk until thoroughly combined. Add the dry ingredients and mix with a wooden spoon until incorporated. The dough should be very thick but too soft to roll into balls. Refrigerate for 30 minutes to firm up, don't leave it in so long the dough gets hard. (Note 2 for skipping this step.)
Coating and baking:
- Preheat oven to 180°C/350°F (160°C fan-forced). Line 2 baking trays with baking paper/parchment paper.
- Prepare coating - Place the sugar in one shallow bowl and the icing sugar in another. Wider bowls make coating easier.
- Roll balls - Take the dough out of the fridge. It should be firm enough to roll into soft balls (if not, refrigerate a little longer). Scoop out 1 1/2 tablespoons of dough (size 40 cookie scoop) and roll into balls. You should get 20–22 balls.
- Coat - Roll a ball lightly in the sugar, then coat in the icing sugar, packing it on thickly until the ball is completely covered. Aim for full coverage so you can't see cookie dough! Place on a prepared tray. Repeat with enough balls to fill both trays, spacing them 7.5cm/3" apart. (I do 6 per tray for the first batch, then 4 - 5 per tray for the second. Feel free to fit more if you have larger trays and oven.) Keep the remaining uncoated balls in the fridge until needed (don't coat until just before baking, it will sweat off).
- Bake for 13 minutes. The cookies will puff up into domes and be very soft. Don't open the oven or rotate the trays during baking - this can cause the cookies to collapse. The cookies are ready when they have a light crust on the outside but they will still be jiggly inside.
- Cool - Leave the cookies on the trays for 5 minutes to set a bit (the outside goes crispier and the inside will set like fudge). Then carefully transfer to cooling racks using a spatula, cool for another 5 minutes (avoid touching the icing sugar coating with your fingers). Coat and bake remaining dough balls. Most people enjoy these a bit warm. But I like them fully cool because they become chewier and fudgier!
Notes
1. Chocolate and cocoa powder - Don't substitute the dark chocolate (semi-sweet chocolate) with a higher cocoa chocolate (like 70% cocoa or bittersweet chocolate) and don't use dutch processed instead of regular cocoa powder. This will mess with the cookie dough thickness - it will make it drier and firmer, so the cookies may not spread.
2. Refrigeration time - Only refrigerate the dough for as long as needed to scoop and roll balls, if you leave it in for longer than 1 hour, the flour can absorb too much moisture and the cookie may not spread and crack properly.
Skip the refrigeration time by adding an extra 1/4 cup flour to the cookie dough which makes it firmer so you can roll it straight away. The cookie will spread slightly less, be a little thicker and looks slightly more cakey inside but it is still fabulously fudgy inside when you eat it. (It's just even fudgier if you stick with 1 cup flour + 30 min fridge :)! )
Storage - Keeps 5 days in an airtight container in the pantry. As long as it’s not super hot and humid where you are, the snowy white icing on the cookies should last for 3 – 4 days before it starts to fade, thanks to the double sugar coating.
Making ahead - I haven't figured out if it's possible to make the dough ahead and bake later. The versions I've tried so far haven't worked great, they taste fined but the cookies didn't spread/crack as they should. Will come back and update if we can figure it out!
Nutrition per cookie.
Nutrition
Calories: 132cal | Carbohydrates: 17g | Protein: 2g | Fat: 7g | Saturated Fat: 4g | Polyunsaturated Fat: 0.3g | Monounsaturated Fat: 2g | Trans Fat: 0.1g | Cholesterol: 21mg | Sodium: 22mg | Potassium: 125mg | Fiber: 2g | Sugar: 9g | Vitamin A: 93IU | Calcium: 26mg | Iron: 2mg