
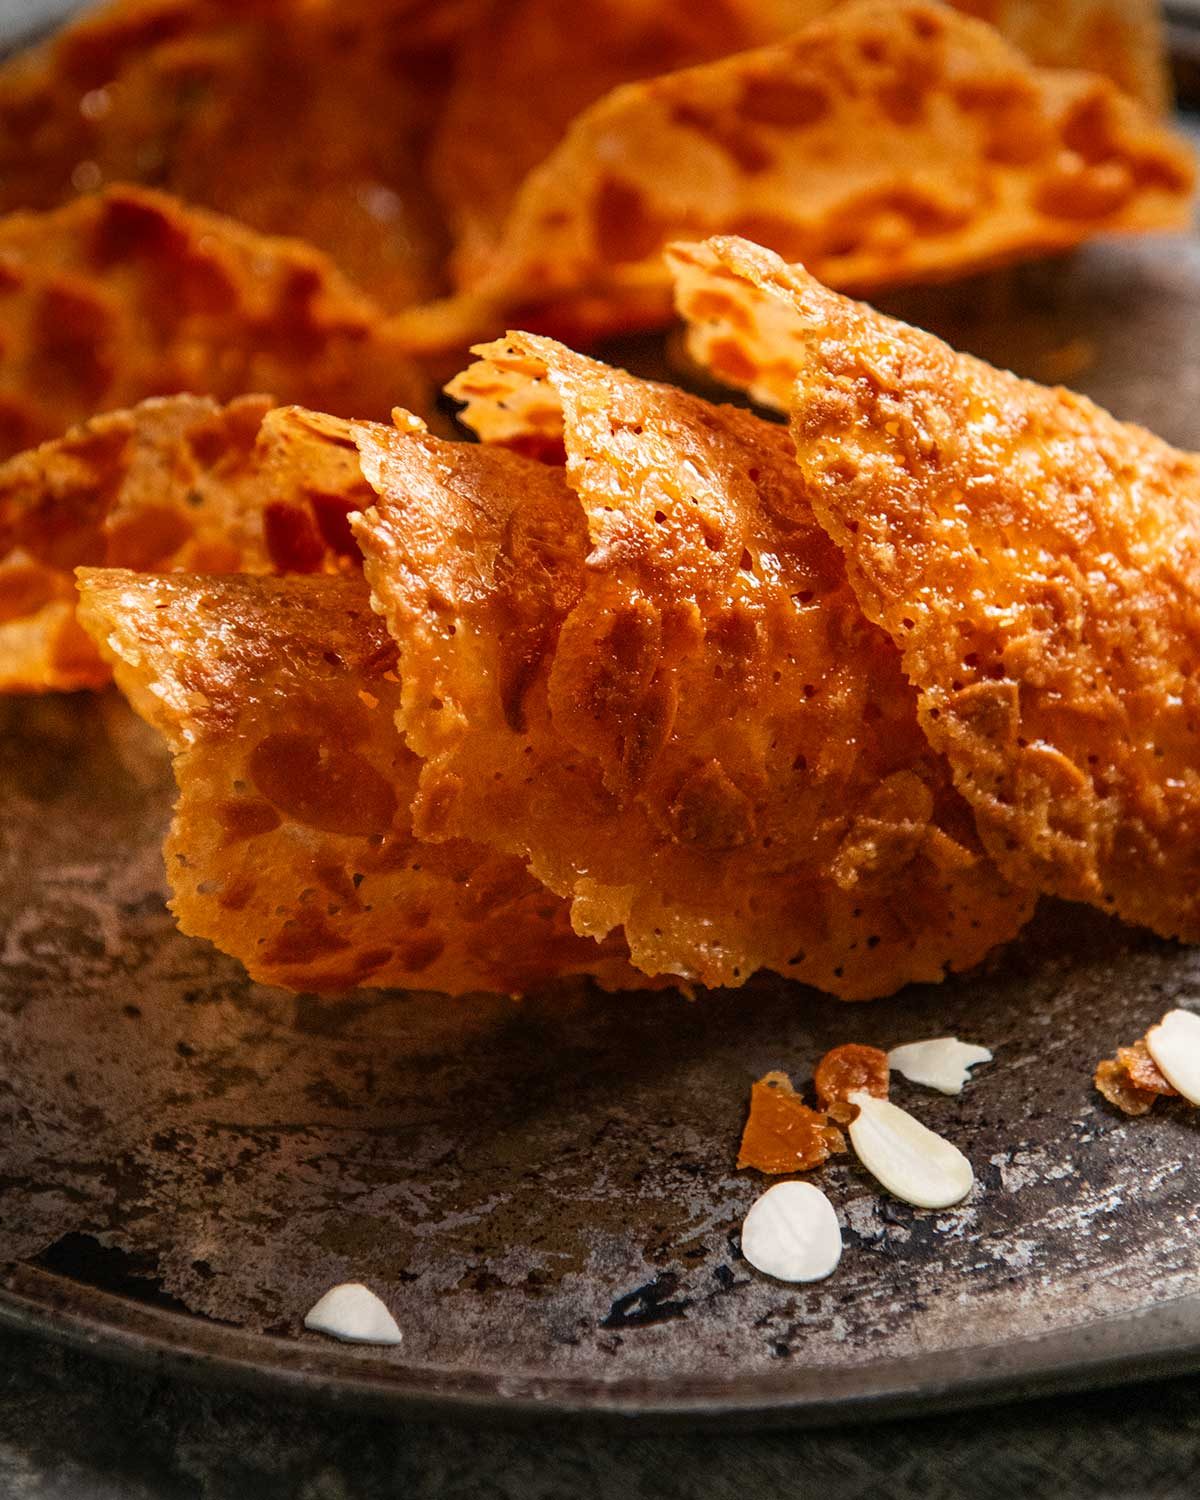
These caramelised, wafer-thin Lace Tuiles (pronounce “tweel”) are a simple French snack or dessert that always makes an impression. As the name suggests, these biscuits look just like a piece of delicate lace, only even better as they’re edible!
Nagi's Notes


I have fallen HARD for these tuiles!! They are so amazing – incredibly fine, shatteringly crisp, and they have the most divine caramel flavour. They remind me of good ole’ brandy snaps, except these are more crisp and don’t have ginger or brandy flavour. And they are EASY to make! Watch the video and you will see!

Almond Lace Tuiles
French tuiles are those classic wafer-thin biscuits you often see served with ice cream and plated desserts in restaurants, either rolled into cigar shapes or presented as delicate shards. I made countless batches of them in my first restaurant job, and you find them all over France, from elegant pâtisseries to local bakeries. They are very traditional.
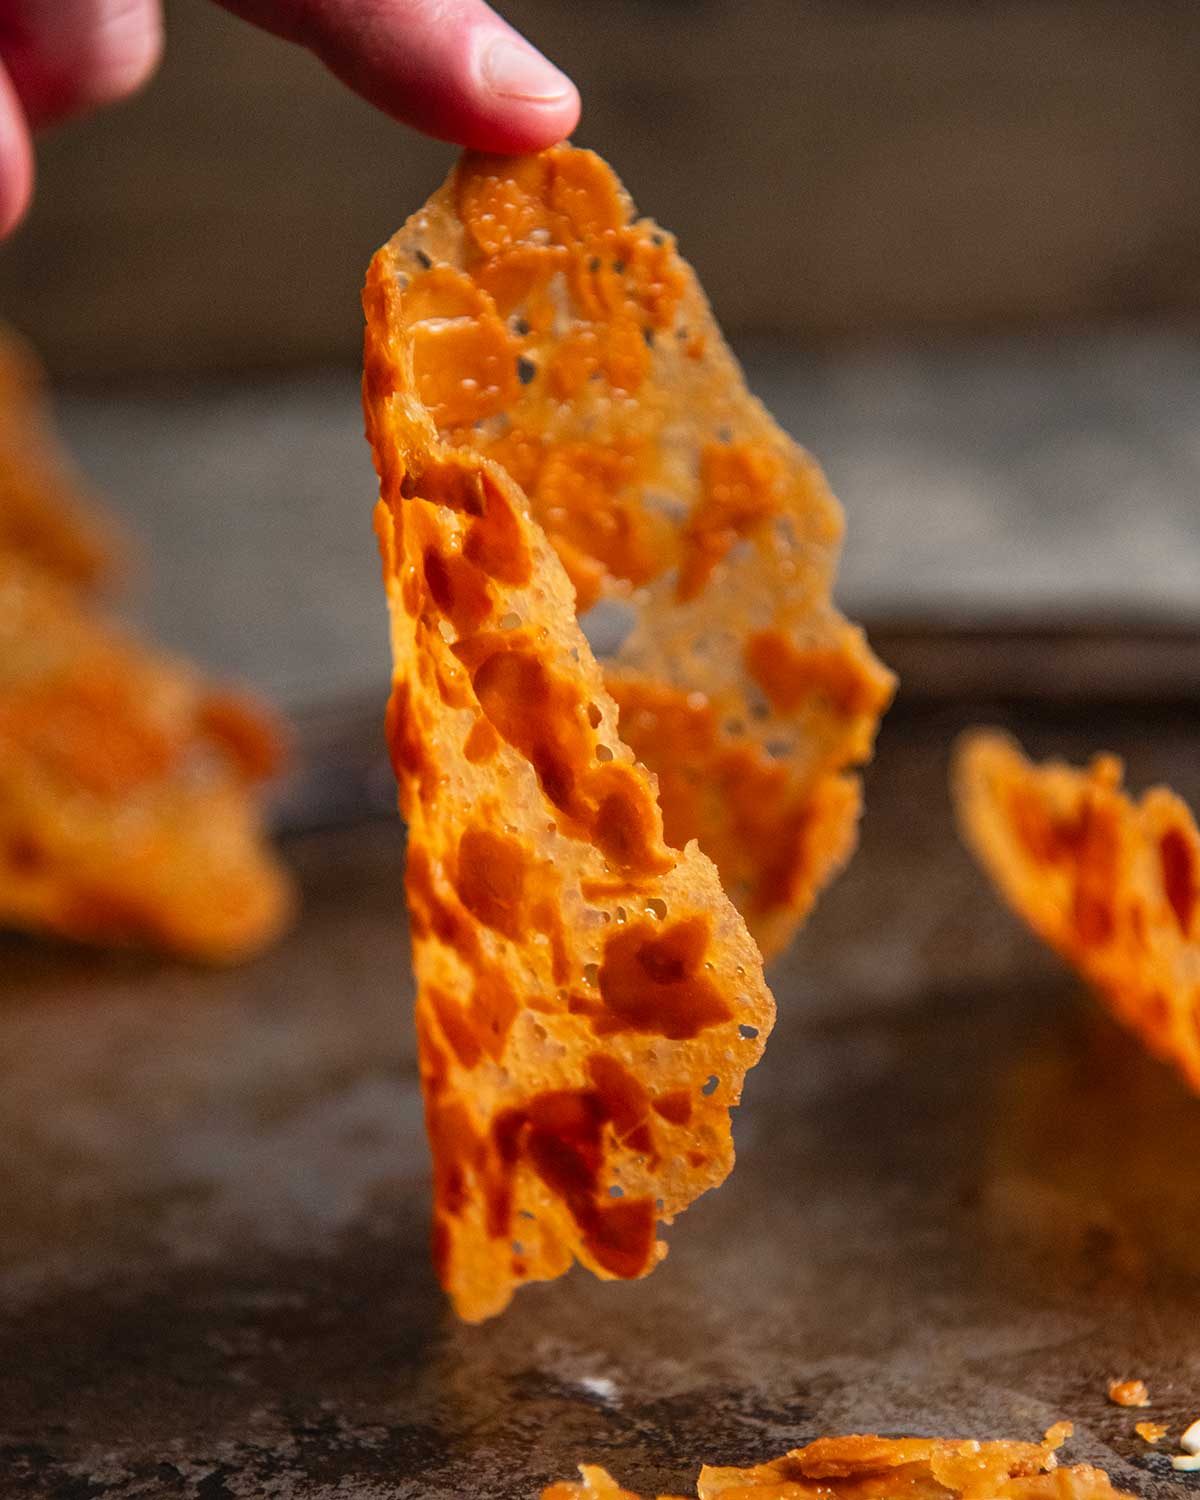
Many home-style recipes look more like thin vanilla biscuits. But in France, and in restaurants, tuiles are baked until deeply caramelised and wafer-thin, creating the beautiful lace-like pattern that makes them so recognisable. C’est magnifique!
I make my tuiles into a U shape as this is the most common shape. But they can be moulded into other shapes such as cigars and baskets, or even keep them flat.
Tuiles vs Brandy Snaps
If you know what brandy snaps are (an Australian and English biscuit), these tuiles will feel familiar. They have the same delicate lace-like look and caramelised flavour, but they’re even crisper, with a lovely almond flavour instead of the ginger and brandy notes that make brandy snaps so distinctive.
Ingredients
You only need 5 ingredients to make Almond Lace Tuiles.
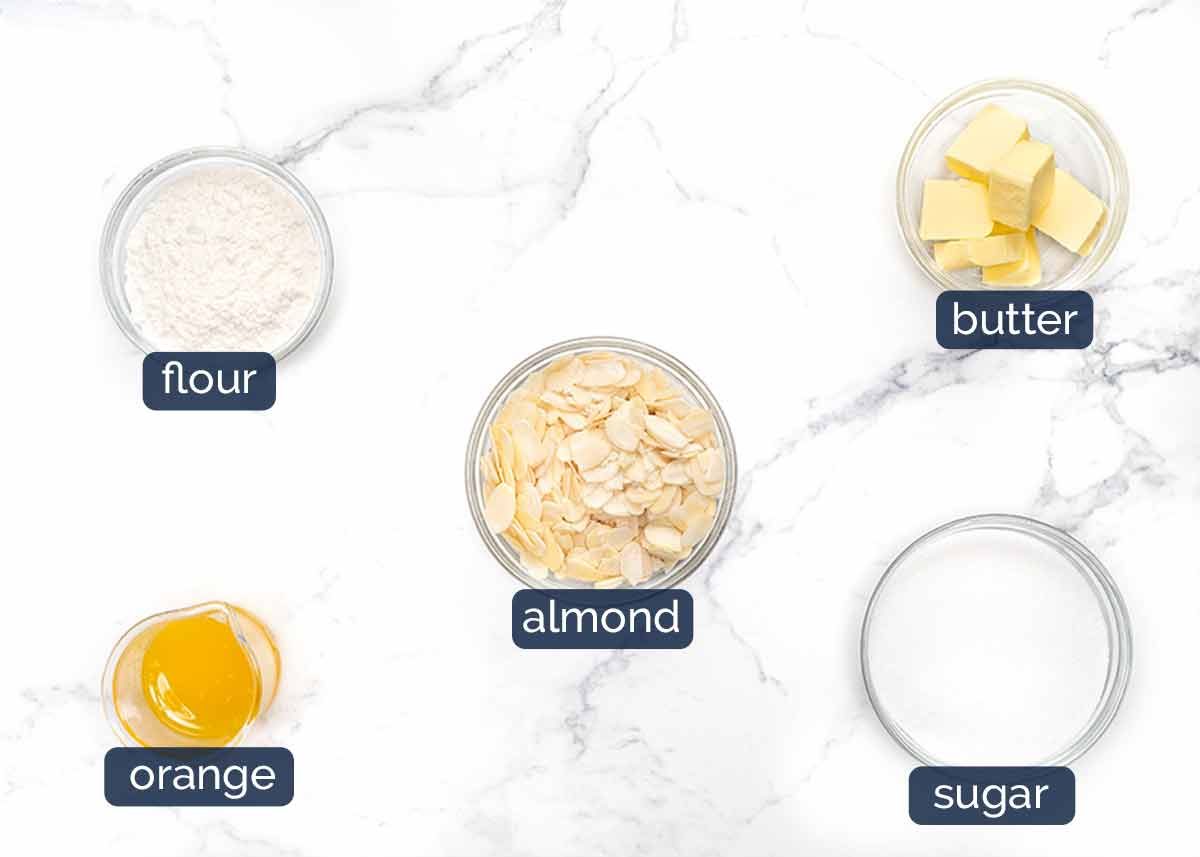
Flaked almonds – This is the almond flavour in these tuiles. I use flaked almonds because they are thin and delicate, just like the tuiles themselves, so you don’t end up with lumps on the surface. They also toast evenly, giving the tuiles a more refined texture and appearance.
Orange juice – This is the liquid to thin the biscuit batter so it spreads to make the tuiles thin. The orange flavour is the classic combination with the caramel and almond flavour in the tuiles.
Unsalted butter – The butter is melted then simply mixed into the batter.
Sugar – Use caster sugar (superfine sugar) because it melts more easily than regular sugar which has larger grains.
Flour – Plain flour / all-purpose flour. There is no baking powder in tuiles so don’t substitute with self-raising flour.
How to make Almond Lace Tuiles
The key to making tuiles is to shape them after they have cooled enough to set so they can be lifted without breaking, but still warm enough to be shaped. This window is about 2 minutes so you don’t need to rush, but don’t be worried if you do miss it because they can be put back into the oven to soften again and you can have another go.
1. Make tuiles batter
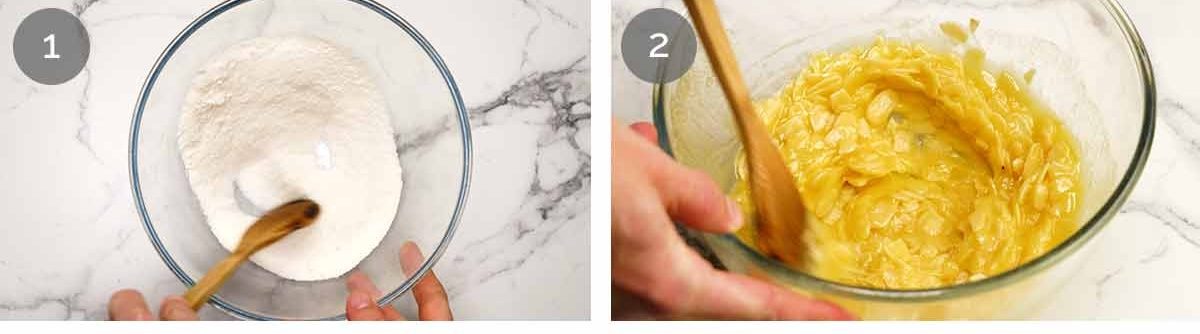
Mix dry ingredients – Place the flour and sugar in a bowl and stir to combine.
Add wet ingredients and almonds – Add the melted butter and orange juice and stir them in until you can no longer see any bits of dry ingredients. Fold the almonds in gently with the spoon until evenly combined.
The batter is quite loose at this stage. Refrigerate for 2 hours to firm it up so it can be scooped. This also gives the flour time to hydrate which helps to ensure the tuiles have the paper thin snap.
2. Bake and shape
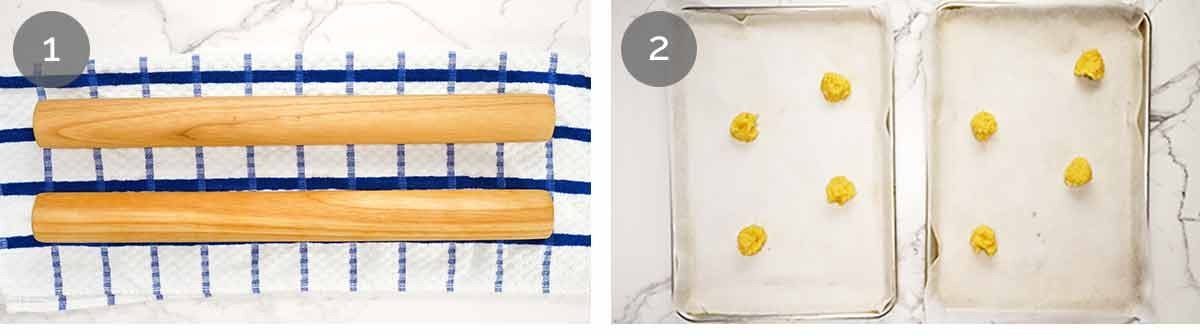
For shaping – You will need something that is cylindrical so the tuiles set in a U shape. I use 2 rolling pins that are 4.5cm / 1.6″ wide. You can use glasses or even slim bottles (eg vinegar bottles).
Place the rolling pins (or whatever you are using) on folded tea towels to stop them from moving.
You can also make them into other shapes like cigars, baskets, or even keep them flat. See FAQ for more information.
Mound on trays and first bake – Line two baking trays with baking paper / parchment paper. Scoop out tablespoons of the batter and create four mounds on each tray. The tuiles will spread, so leave 10 cm / 4” between each mound.
Bake in a preheated 170°C / 340°F (150°C fan-forced) oven for 5 minutes. The batter will spread and they will still be light-coloured at this stage.
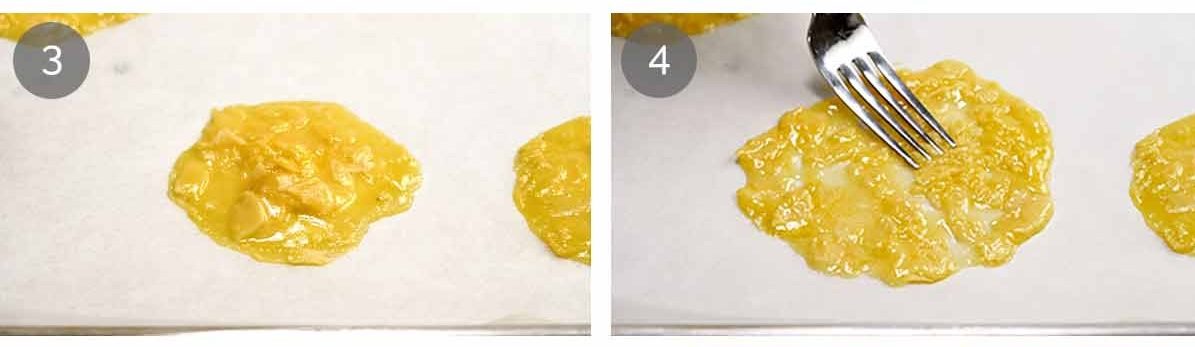
After first bake – This is what the tuiles look like after 5 minutes in the oven. They will have spread a bit and some might have a little hump in the middle. If we don’t give them a little helping hand, they will not spread enough to become thin and crispy, so now we spread them a bit.
Flatten and spread tuiles – Use a fork to gently spread and smear the partially cooked tuiles to spread them out into 10 cm / 4” circles. They don’t need to be perfectly round, just do your best. Don’t worry about any holes, the batter will spread to close them up during the second bake.
This is a step you don’t typically see in standard recipes. It is a technique I learnt at restaurants which ensures that the tuiles will be as thin as possible and crispy, and have the signature lace-look.
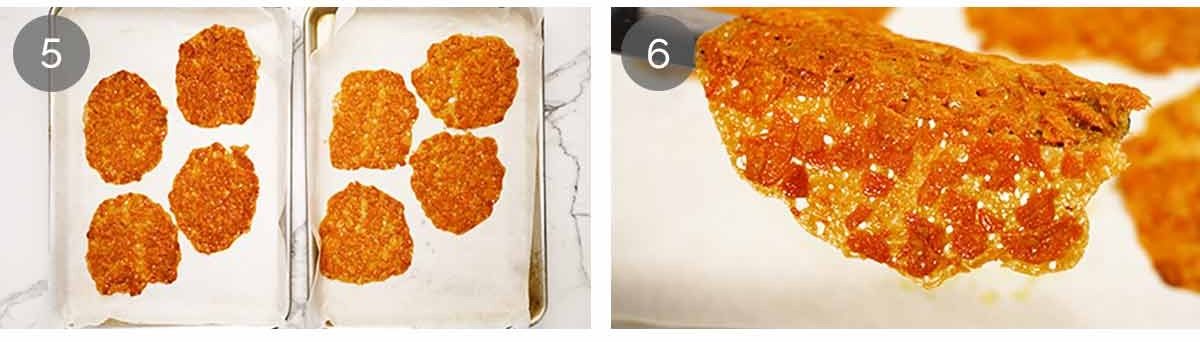
Second bake – Return the tuiles to the oven and bake for a further 13–15 minutes until a lovely dark golden brown colour. Leave to cool on the trays for 1 minute so they firm up slightly and won’t break when you move them. If the tuiles have joined together, separate them using a butter knife during this 1 minute cooling time – it has to be done while they are hot and pliable.
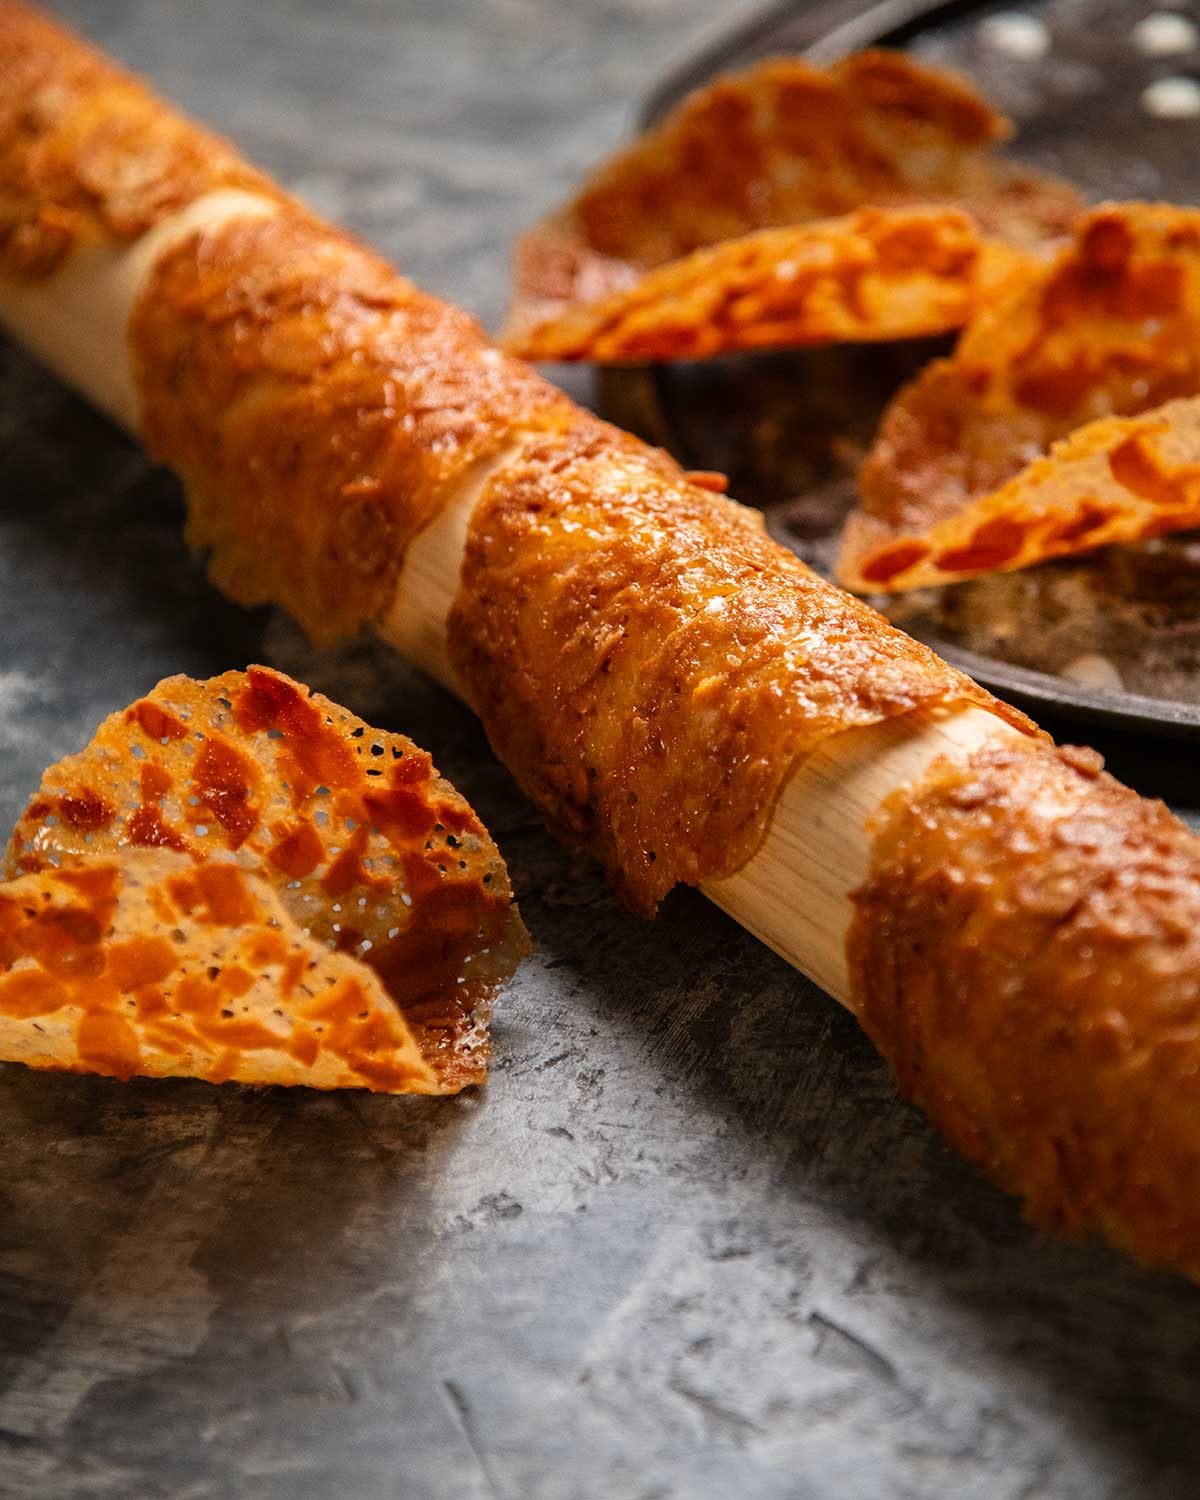
Lift – Use a spatula to lift the tuiles off the trays, one at a time, and transfer them to the rolling pins. You should be able to fit two tuiles on each rolling pin.
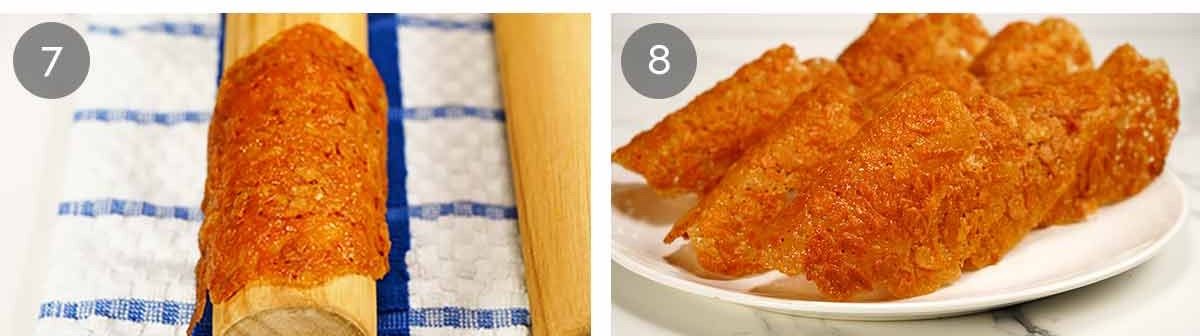
Set in U-shape – Drape the tuiles over the rolling pins so they slightly curl around and form the signature U-shape. They will harden and become crisp as they cool down.
If the tuiles have cooled too much and aren’t bending, put them back in the oven for a minute or so to make them pliable again.
Cool completely and serve – Leave the tuiles on the rolling pins to cool for 5 minutes until they are set in the U-shape, then transfer to a wire rack to cool completely. The tuiles will be crisp and able to stand up on their own. Repeat the mounding, baking and shaping process with the remaining batter.
How to eat and serve Almond Lace Tuiles
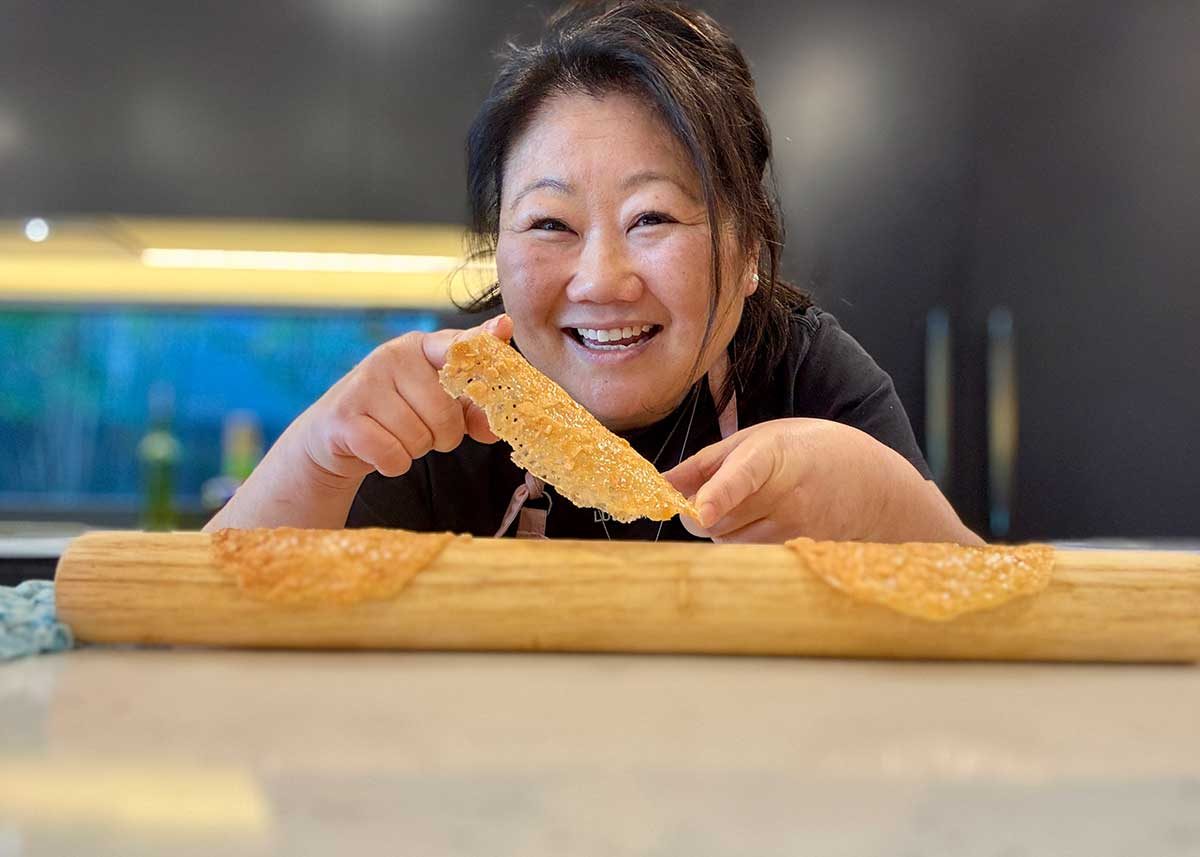
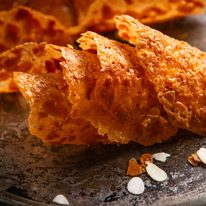
My favourite way is to eat them plain, because they are so delicious on their own. I would buy boxes of them from the local bakery in our village in France and consume half of them on the way home! I think it’s safe to say this is Nagi’s favourite way to eat them too, based on how many she ate when I was shooting these!!
They are perfect for afternoon tea or a light dessert after dinner with tea or coffee. At restaurants I worked at, we would also use them as a dessert topper – tucked into scoops of ice cream, mousses or plated desserts to add a delicate crunch.
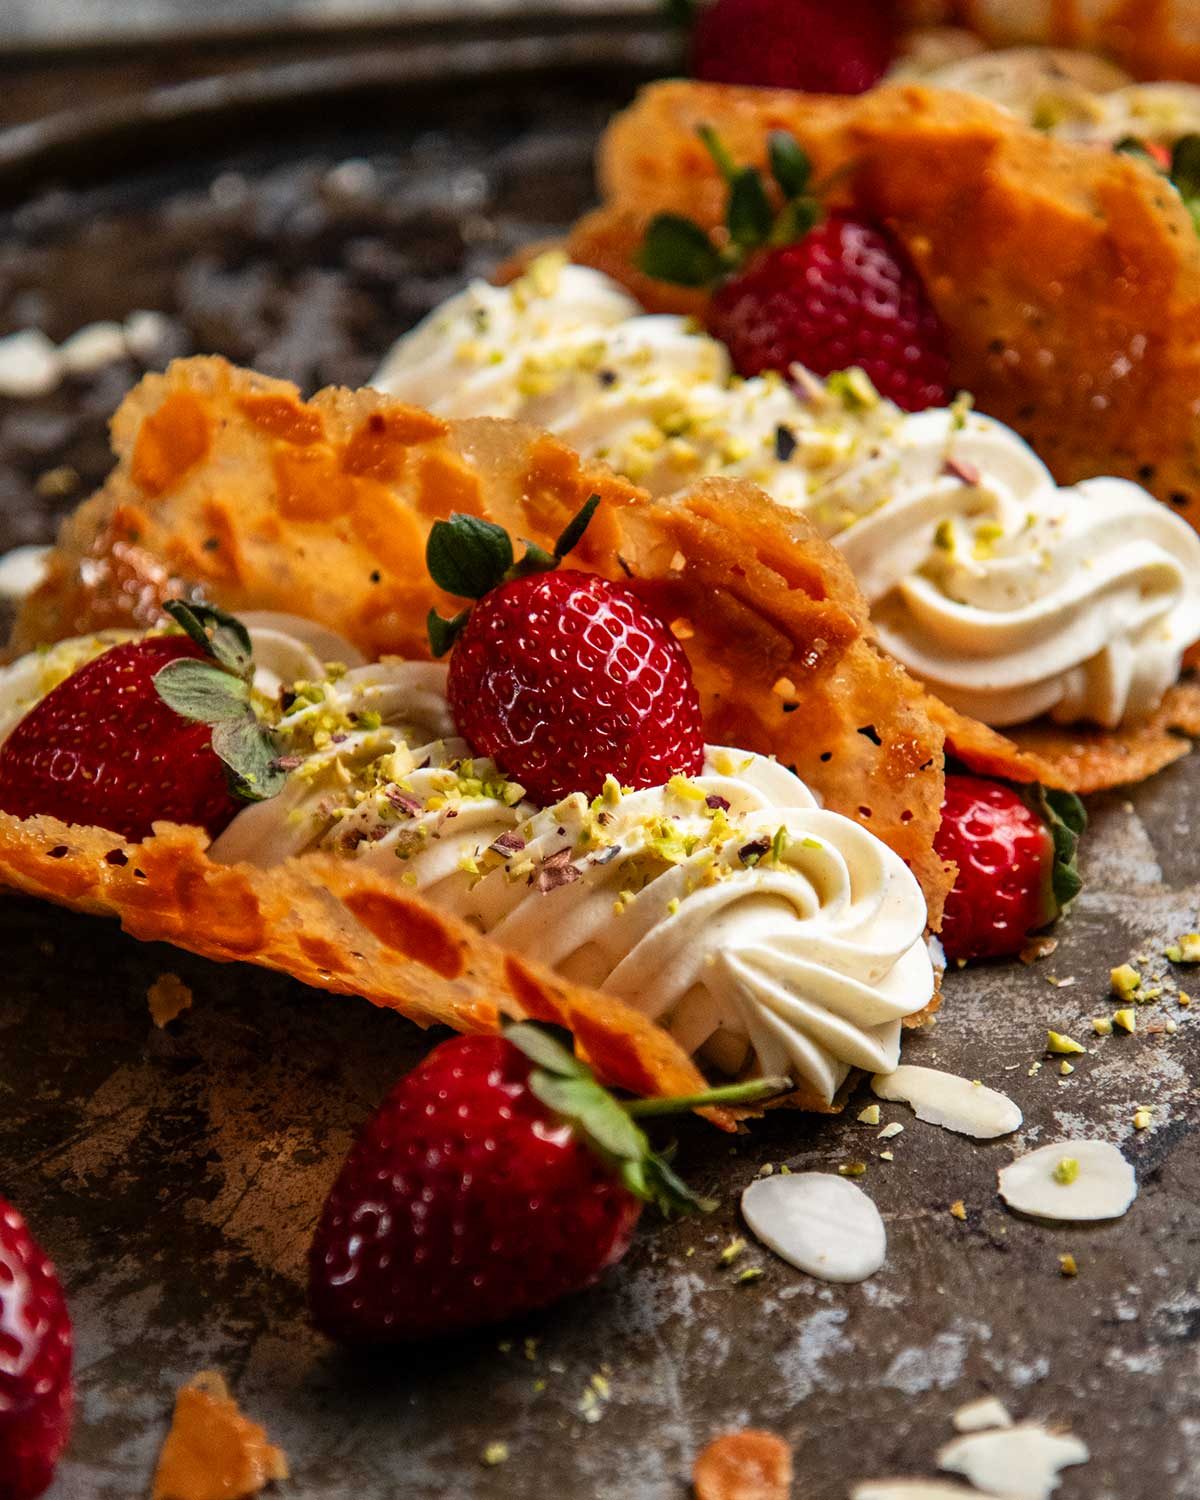
To make it a little fancier, they can be served filled with whipped cream and berries, like pictured below.
Whichever of these options you choose, I hope these tuiles bring as much pleasure to you as they have to me over the years. Please don’t hesitate to drop feedback if you try the recipe, I’d love to know what you think. Bon appétit! – JB
FAQ – Almond Lace Tuiles
Yes they are similar, the same lace-like pattern and they are both thin, crisp and caramel coloured. However, the key difference is that tuiles are crisper, and brandy snaps have a ginger and brandy flavour whereas the tuiles are almond flavoured.
For those of you who don’t know, brandy snaps are an old-school Australian and UK dessert. They are traditionally rolled into tubes and are often filled with whipped cream for dessert.
Probably, though I haven’t tested it myself. There’s only a small amount of flour in the batter, so a good-quality gluten-free plain flour blend should work as a substitute. The texture of the batter may be slightly different, but I expect you’ll still get a crisp, lace-like tuile.
Resting a tuile batter allows the flour to fully hydrate and the gluten to relax, which creates a smooth consistency ensuring your finished tuiles develop that perfect, delicate, paper-thin snap.
Yes. Both work well. Slivered almonds create a slightly more textured appearance while flaked almonds give a finer, more delicate pattern.
No problem. The rolling pin is just used as a mould to give the tuiles their classic curved shape. You can use any cylindrical object of a similar size, such as a thin bottle or a drinking glass.
Absolutely. You can make them into any shape you want while they are still warm and pliable. For example, roll them into cigars using cannoli tubes or similar, or press them into muffin tins to make baskets. You can even keep them flat, they’ll still be delicious!
Watch How To Make It
Hungry for more? Subscribe to my newsletter and follow along on Facebook, Pinterest and Instagram for all of the latest updates.
Almond Lace Tuiles
Ingredients
- 2/3 cup caster sugar (superfine sugar)
- 1/4 cup plain flour (all-purpose flour)
- 50g / 3 1/2 tbsp unsalted butter , melted
- 3 tbsp orange juice (Note: I use 15 ml tablespoons. Some tablespoon measures in Australia are 20 ml)
- 3/4 cup almond flakes , or slivered almonds
Instructions
ABBREVIATED RECIPE
- Mix flour and sugar, mix in butter and orange juice, then almonds. Refrigerate 2 hours. Dollop 4 x 1 tbsp mounds on a tray (do 2 trays). Bake 5 min, spread melted tuiles into 10cm/4" circles, bake 13-15 min until deep golden. Cool 1 – 1 1/2 min, lift and shape on rolling pins, will crisp as they cool.
FULL RECIPE
- Mix dry – In a bowl, combine the caster sugar and plain flour using a wooden spoon or a spatula.
- Add wet – Pour in the melted butter and orange juice. Mix until combined.
- Add almonds – Gently fold in the almond flakes. The batter is quite loose, it is not a stiff cookie dough.
- Refrigerate for 2 hours. This firms up the batter to make it scoop-able.
- Preheat the oven to 170°C / 340°F (150°C fan-forced). Line 2 baking trays with baking paper / parchment paper.
- Mounds – Scoop a tablespoon of mixture out of the bowl and use a teaspoon to scoop it out onto the tray. Do 4 mounds on each tray, leaving about 10cm / 4” between each mound.
- First bake – Bake for 5 minutes. The mounds will have melted (mostly or fully). Remove the trays and, using a fork, gently press and spread each into a 10cm/4" circle – do your best, they don't have to be perfect circles. Don't worry if you have holes, they will close up as the batter melts in the 2nd bake. This step is what makes the tuiles so thin they end up with the signature see-through lace pattern.
- Second bake – Return to the oven and bake for another 13 to 15 minutes until they are deep golden brown, not just a light golden. The bottom tray may need an extra 1 to 2 minutes.
- Prepare shaping station – Place 2 rolling pins over folded tea towels so they stay stable. (Note 1)
- Cool 1 minute – Remove trays from the oven. Let the tuiles cool on the tray for 1 to 1 1/2 minutes so they slightly firm up enough to be able to lift them with a spatula without breaking. (Note 2) If the tuiles have melted into each other, separate them during this time – just use a butter knife.
- Shaping – The video is helpful here (at 1.05 minutes ). Working quickly, gently lift them using an offset spatula or regular spatula and place them over the rolling pins to create their signature curved shape. If the tuiles set too much to be shaped, pop them back into the oven for a minute or two, until they become pliable again.
- Cool to crisp – Leave to fully cool and crisp (about 5 minutes) then transfer onto a cooling rack to fully cool. (Note 3)
- Repeat the same process with the remaining tuile mixture.
- Serve with desserts, ice cream, coffee or simply enjoy as a crisp sweet snack. They are also lovely filled with whipped cream and berries, as pictured in the post.
Recipe Notes:
Nutrition Information:
Life of Jaffle
As you probably already know, this little fellow is the newest addition to the team. I only met him a few days ago but he’s already helping me type up this post on the computer, our very first RecipeTin Eats post together.

His contribution was mostly walking across the keyboard and demanding pats, but every team member has their own strengths. 😅 And I’m sure you can guess that it’s very hard to focus with this level of cuteness around.
I like to think that Dozer is keeping an eye on him from above, making sure he’s settling in properly. And I have a feeling he’d be happy to see Jaffle here with us, bringing a little more joy and mischief into the office.
Thankyou JB for a very easy to follow recipe. I made a half batch to test, They were amazing, so much better than brandy snaps i have made in the past, also found them not to be as brittle, Delicate yes. I wish i had made a full batch now…hehehe
These are scrumptious and did not last long at all bc they are so moorish 😋. With my second batch I sprinkled on some sea salt flakes after first bake which gave them a salted caramel flavour… delish! Thanks for an fancy easy recipe JB 😁
Thank you for your report Angela! Really appreciate it 🙂
Even though it’s heat wave here in UK when I saw this recipe I wanted to make it. Made these yesterday and couldn’t believe how easy they were to make. Kept mine flat and cut into small pieces – perfect sweet with a cup of black coffee. The orange juice gives it a lovely flavour. Just like Nagi you explain it all so well.
The recipe is now hand written in my box of favourite easy recipes. Thankyou so much Chef JB
Cheers
You are so welcome Fiona! I’m glad it worked out well for you and thank you for your feedback 🙂
JB-these were excellent! I lost an old recipe that was similar (made without almonds or orange juice.) These were so easy and had great flavor. Surprisingly, I didn’t have to do the first spread after 5 minutes. By the second batch I had the size and shape perfected. Thanks for sharing this ‘fancy’ recipe!
Thank you Jennifer for making it!!
Just fantastic, the second bake is fabulous making them so caramelised and delicious with the orange juice. My new favourite. Thanks JB
Thanks for trying the recipe so quick Jenny! I’m glad you loved them!
Hi JB,
Mate – lately you seem to be concentrating on desserts.
Need real bloke food.
LIke a cassoulet or a “pot au feu”.
Cheers Joe
I promiss I’ll work on that Joe! I appreciate the feedback 🙂
Trying the fish pie this week. Give it a go
What can the sugar and flour be substituted for please?
I love all your recipes and thank you for sharing.
Hi Liz, the sugar is essential in this recipe. It melts during baking to create the caramelisation and delicate lace pattern, so I don’t recommend substituting it with alternatives like honey, maple syrup or artificial sweeteners as they won’t behave the same way. The flour also plays an important role, even though there’s only a small amount. It helps bind everything together and gives the tuiles their delicate structure. If you need a gluten-free version, a good-quality gluten-free plain flour blend should work (though I haven’t tested it myself).
😟 thank you for replying. I will definitely be making these for family and friends but sadly I will only be eating the aroma, which, I’m sure will be nearly as good.
Photo 📷 w Jaffle si mignon
These biscuits are too easy. Oh no!! They could be very addictive.
Merci Chef JB
They are VERY addictive! Just ask Nagi haha!
I was in love with Dozer and already in love with Jaffle. It seems he may be even bigger than Dozer when grown! Both so precious.
I am curious to know JB’s story. How did he begin in France and immigrate to Australia?
Thanks Anita, Jaffle is already being a big part in our hearts and lives. I have a page here if you are interested 🙂
I’m so pleased that Jaffle is taking his job so seriously. Well done Jaffle, Dozer is watching you.
Thank you for your kind words Carolyn 🙂
Enjoyed the “crunch” ASMR! Happy to see you and the newest member of RTE getting along so well.
There is a part of the instructions that has (at X.X minutes ), was that meant to be a specific number of minutes?
Thank you Cher! Sorry yes, just fixed it. 🙂
Jaffle is such a cutie but I still well up everytime Dozer is mentioned.
Thank you for remembering him ♥️
JB, if you write a cookbook you should put the photo of the tuiles with whipped cream and berries on the cover! It looks so real that one could reach for a tuiles! Making them sounds like a fun project.
Jaffle is adorable!!! I’m sure Dozer is watching over him!
That’s sounds like a great idea, I can already imagine the book 🙂
I love tuiles but haven’t made them for years ! I have planned to make Nagî’s Chinese orange chicken for a lunch with friends this weekend and I was looking for a dessert with oranges . And … here come your tuiles 👍! I will make them to serve with a sliced oranges salad (with a dash of cointreau 😉!)
Jaffle and you, plenty of joyful moments in sight ! So great to see you all happy again !
Thanks Adeline, perfect timing! Please let me know how it went 🙂
Jaffle a new baby is amazing. Dozzer feel happy in the rainbow saw his son happy.
Thanks Jacqueline 🙂
What would you put into your Almond Lace Tuiles? How would you serve, dessert??
Hi Bharti, it would be just like the last photo, filled up with whipped cream then topped with fresh strawberries.
What last photo? I can’t find that one.
Welcome, cuddle bug Jaffle!
Lovely, detailed recipe; looked up “sound” pronunciation on YouTube
Thanks Paula, yes it’s pronounce “tweel” with a silent s.
Yes I agree with Eha – Jaffle looks very relaxed with you JB!! The recipe tin family work well together and that shows! Love the recipe and will try as I used to make brandy snaps for my dinner parties which went down a treat so can’t wait to try these out. Thank you ☺️
Hi Patsy, thank you so much! Jaffle has settled in so quickly and already acts like he’s been part of the family forever. I’m so glad you like the look of the recipe too. If your brandy snaps were a hit, I think you’ll really enjoy these, they’ve got that same delicate crispness but with a lovely almond flavour. Hope you love them!
Can these be made with a Gluten Free Flour
Hi Lucy, probably, though I haven’t tested it myself. There’s only a small amount of flour in the batter, so a good-quality gluten-free plain flour blend should work as a substitute. The texture of the batter may be slightly different, but I expect you’ll still get a crisp, lace-like tuile.
Dozer gives the paw 🐾 of approval I’m sure 🧡💛
These should come with a diet warning ! ⚠️
Look delicious and cupboard staples ready to roll ,thanks JB & Junior Chef Jaffle
Thank you Tiff for your comment. Junior chef approves!