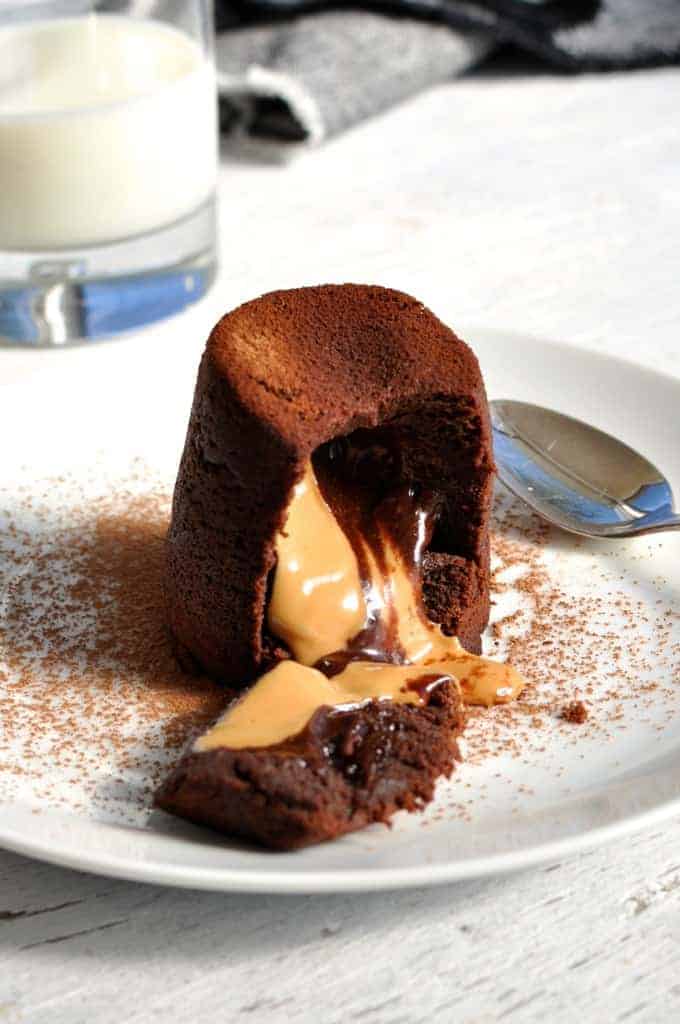
This looks luxurious and impressive, but it’s only 6 ingredients and so easy to make. It takes just over 5 minutes to prepare to pop these into the oven – it’s insane! The peanut butter filling is optional. I go nuts over peanut-butter anything, but you can easily just leave it out. That moment when you cut into this Peanut Butter Chocolate Molten Lava Cake and that molten centre comes running out… pure wow!

“The sight of the peanut butter and chocolate oozing out of the cake makes me weak in the knees.”
I don’t bake sweet things much. So when I do share a dessert recipe, you can be assured of two things:
1. It’s really easy; and
2. It is worth the effort to make.
This lava cake knocks it out of the park on both counts. I used to see photos of lava cakes in gourmet magazines and just assume it was too hard. But then I was tasked with making dessert for a family dinner and a lava cake was specifically requested by someone. I was rather unenthusiastic when I started searching for recipes because I was sure it was going to require a lot of effort and science because surely a dessert that looks this impressive has to be annoyingly tedious to make. Right?
“The batter for this can be made ahead which makes this a sensational desert for a fancy schmancy dinner party!”
So you already know the ending to that mini story – that I was pleasantly surprised to discover that it was in fact ridiculously easy to make, and of the 15 times or so that I’ve made it since, it has never failed. Every time I make it, I almost expect it to fail and so I get really excited when I cut into it and the “molten” centre oozes out.
I think that’s partly why I love this. The thrill of anticipation. The element of danger (ok, not danger. The risk of failure!).
I made this with a peanut butter lava centre because the sight of peanut butter and chocolate pouring out of the cake when I cut into it makes me weak at the knees. It’s like all my favourite desserts rolled into one. Also the touch of saltiness from the peanut butter is a contrast to the rich chocolate.
I was also pleasantly surprised to discover that these can be made ahead. The batter can be stored in the refrigerator for a few hours, then just bring it to room temperature and pour it into the moulds. I’ve only made it ahead by a few hours so I’m not sure how it would be if made the day before. But even being able to make ahead a few hours is really handy when you’re entertaining. I have read in other recipes that you can refrigerate it with the batter in the moulds, but I found that the cakes stick a bit more too the mould.
I have to sign off now. There’s a lava cake waiting for me.
Happy cooking! – Nagi
Hungry for more? Subscribe to my newsletter and follow along on Facebook, Pinterest and Instagram for all of the latest updates.

Peanut Butter Chocolate Molten Lava Cake
Ingredients
- 7 oz / 200g dark chocolate melts (note 1)
- 3.5 oz / 100g unsalted butter , chopped
- 2 eggs
- 2 egg yolks
- 1/2 cup caster sugar
- 2 tbsp flour
- 5 heaped tsp smooth peanut butter
- Cocoa powder , for dusting
Instructions
- Preheat oven to 200C/390F (standard) or 180C/350F (convection/fan forced).
- Place chocolate and butter in a bowl. Microwave in 30 second bursts, stirring in between. Stir well to combine butter and chocolate and leave to cool for 5 minutes.
- Meanwhile, generously grease 5 x 3/4 cup dariole moulds then dust with cocoa powder. (See notes 2 and 3)
- In a separate bowl, whisk together the eggs (2 x whole eggs + 2 x yolks) and sugar.
- Add the chocolate mixture and mix until combined.
- Add flour and fold through until just combined. Do not over mix.
- Pour batter into dariole moulds until it reaches halfway.
- Drop a heaped teaspoon of peanut butter in the centre of each. Push down gently to mostly submerge.
- Top up with remaining batter until the dariole mould is 3/4 filled. Do not overfill! (Note 4)
- Bake for 16 minutes, or until the top springs back when touched gently. (Note 5)
- Turn out onto plate. If you dusted the mould with cocoa powder, it should slip out easily. If it does not, then run a knife around the edge.
- Serve immediately!
Recipe Notes:

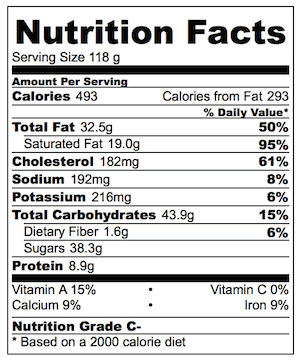
Nutrition Information:

I made this last night for my husband & he loved it! I didn’t make any changes to the recipe. It was perfect the way it is
So good, I did not beleive the recipe was so easy! Thank you for every recipe,
Have you tried to substitute gluten free flour ? Would it still work?
Molten chocolate peanut butter lava cake ,wow so easy and soooo good. thankyou Nagi.
Hi, this recipe looks fabulous! Can I make it in cardboard cupcake holders and eat it straight out of there (without flipping it over)? I also can only bake it at around 300…should I not bother making this under those conditions? Thank you!
Oh my!! This is a keeper for sure. So good and easy-impressive for so few ingredients!!
Hi Nagi, super excited to make this! I do have a question, will it be okay to use regular granulated sugar instead of caster? Also curious if I could use a 6” pan? Thank you!
Yep! It can be used interchangeably in this recipe.
I’m going to give this a whirl tonight! I’m going to use our muffin tray – any advice on how to get them out? Do I just have to tip them all out at once?
Hi Freya, you need to be gentle with them – you’ll have to tip them out all at once! Love to know if it works! N x
Hi Nagi,
Thank you very much for your recipes.It makes me look like a pro when i cooked them.
Regards to the chocolate molten lava cake, no 4: whisk eggs and sugar.
How long do i have to whisk it? Till fluffy?
And no 5: add the choc mixture, again , how long do i need to mix it?
Will overmixing here leads to dense cakes?
Thank you!
Hi Lili, just whisk the eggs until the sugar is mostly dissolved. When you add the chocolate mixture, just mix until combined. Enjoy! N x
Nagi,
I just baked it.
Very soft cake with top crispy.
But the choc lava doesnt flow.
I didnt add in peanut butter.
Is that the reason it doesnt flow instead fudgy?
Or is it because i did in small muffin cups. With yr above recipe, i filled in 8 cups.
Thanks
Most likely it is because it was over baked.
Thanks Nagi🤩
So delicious! I halved this and it made 2 large serves 😋
I’m so glad you loved it Kate!! N x
Nagi, I made twice in 8 days, it was so great great, thank you so much,
Big hug to you thank you
Forgot the rating earlier comment
Million 5 rating for this wonderful recipe
Thank you
Thanks so much Ai!
Made this the other night and it was so rich and decadent! Loved it, I paired it with vanilla ice cream of course to cut some of the chocolate. Would surely make again!
A perfect combination Jessica, I’m so happy you loved it!! ❤️
Hi Nagi, thank you for all your scrumptious recipes. They have turned out amazingly well and made me look like a real cook but truly, all credit goes to you!
For this recipe, do I bake at 200°C for conventional or convection oven?
Many many thanks to you. And Dozer!
200C for a standard oven! 180C for convection/fan 🙂 I’ve updated the recipe!
Of I want just chocolate lava inside, what filling is better to ise, chocolate ganage?
Definitely chocolate ganache!
Thank you for this recipe,I did it for my new year party and everybody loved it,no left overs,thank you very much plus the mushroom rice,it went well with my prime rib roast.thank you,I wish I could hug you.be blessed
Hi
Have you ever tried the recipe with milk chocolate rather than dark chocolate? Just wondering if that would work.
It will work just fine as long as you use baking chocolate 🙂
Hi Nagi
Hoping to try this dessert this weekend (massive peanut butter and chocolate cake fan so
Can’t wait!!)
I was just wondering what flour it is that you used.
Oooh! HOPE YOU LOVE IT Abida! I use plain / all purpose flour 🙂
Hi Nagi,
Just to say made this last night for a group of very appreciative guests. I made the batter up and inadvertently left it lying around at room temperature for 3-4 hours without any consequence. Still cooked up beautifully and the molten centre paired beautifully with a peanut butter and pretzel ice cream!
Thanks for the recipe and the ongoing reliability and variety of your site.
With best wishes,
W.
Fantastic! So glad to hear that Wendy, thanks so much for letting me know! N x
I tried this once and the peanut butter didn’t look as smooth as yours and to be more exact, it moved from the middle of the cake to the bottom of my ramekin (so it’s on top of the cake instead of in the middle when I turned it out onto plate) Is it means that my peanut butter too heavy? I’m confused. May I know what brand of peanut butter did you use?
Oh dear, it does sound like peanut butter is too thick and heavy. I use Kraft which is an Australian brand. It’s really smooth, creamy and spreadable.
Hi! I’m going to try this as an anniversary dessert! Confused on the eggs though – does it need two whole eggs PLUS another 2 egg yolks as in thelist of ingredients? I don’t see the 2 yolks mentioned in the recipe, only to “whisk together the eggs and the sugar”. Please clarify for me!
Hi Maramba! What a fabulous anniversary dessert! So excited to hear what you think 🙂 Yes, you whisk the 2 whole eggs + 2 egg yolks together in that step. I’ll update the recipe to make it 100% clear! 🙂
Made this for the family. Very tasty, used chunky peanut butter was good. Easy clean up. The lava effect was cool. We enjoyed with vanilla ice cream! Thanks for sharing .
I’m SO GLAD you loved it Christy! Thank you so much for coming back to let me know!