
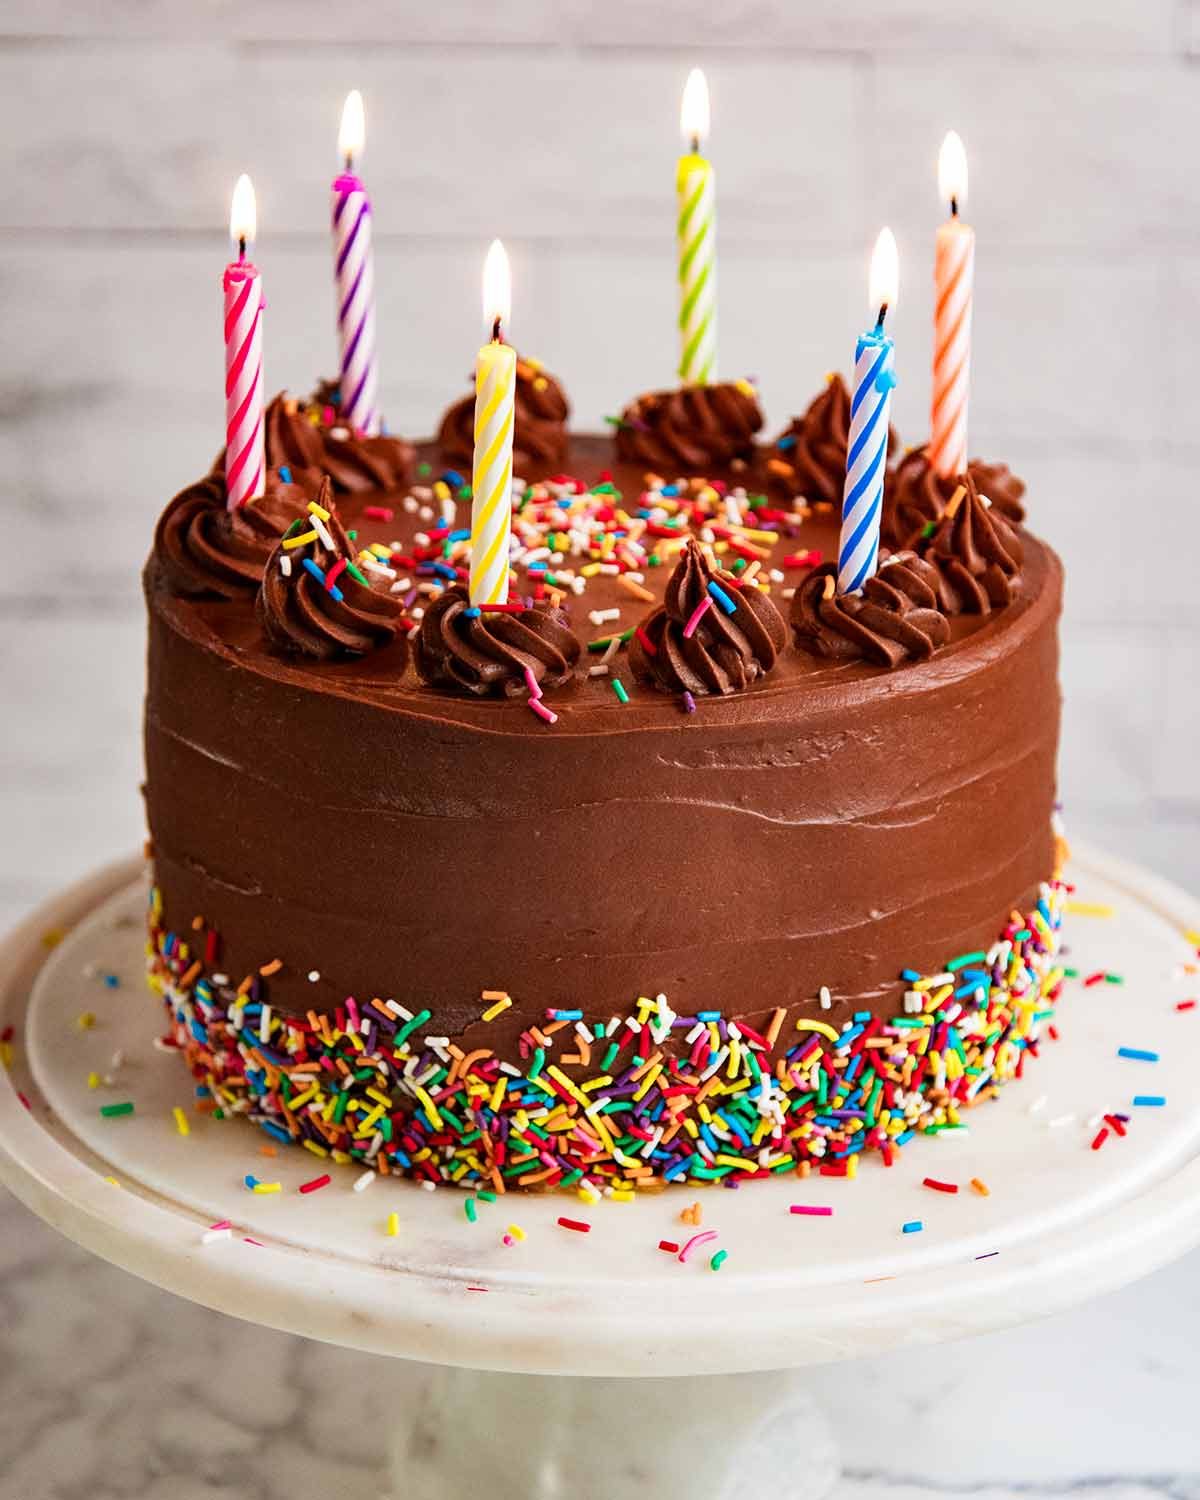
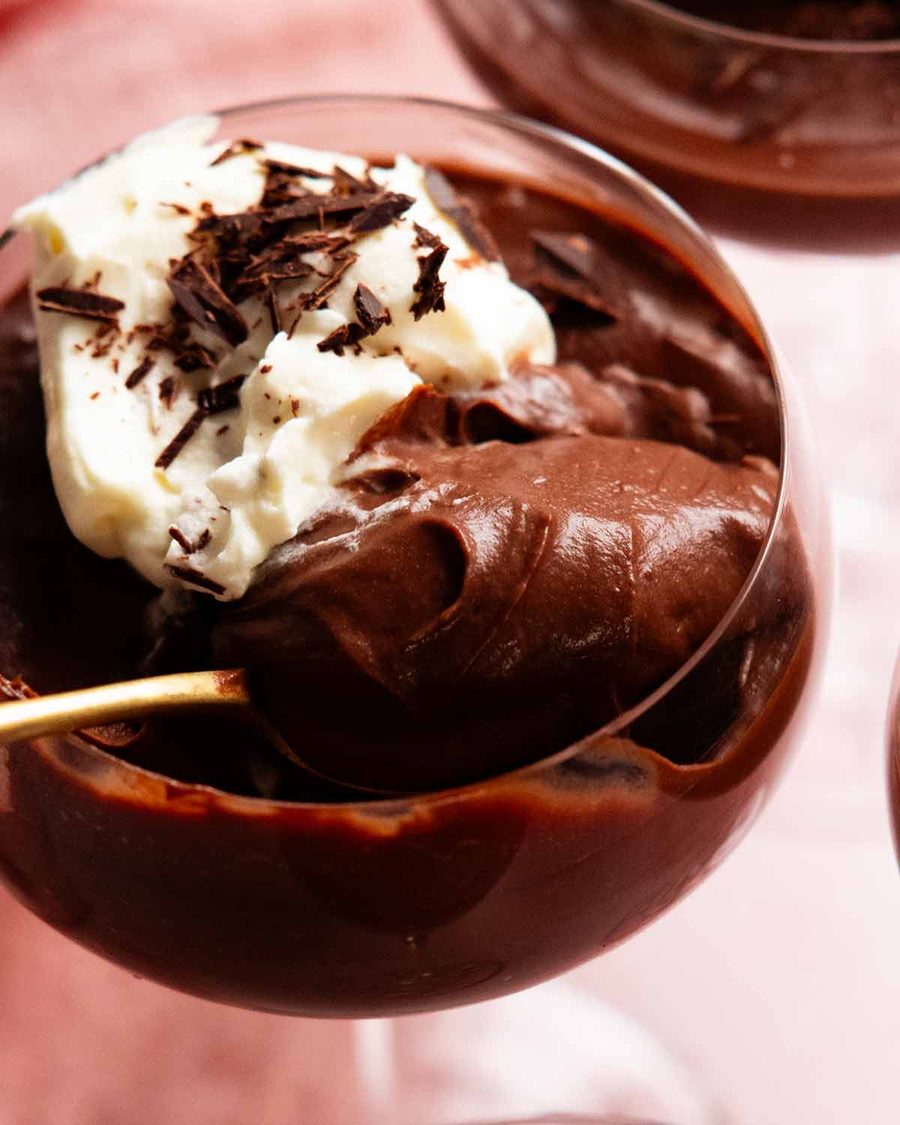
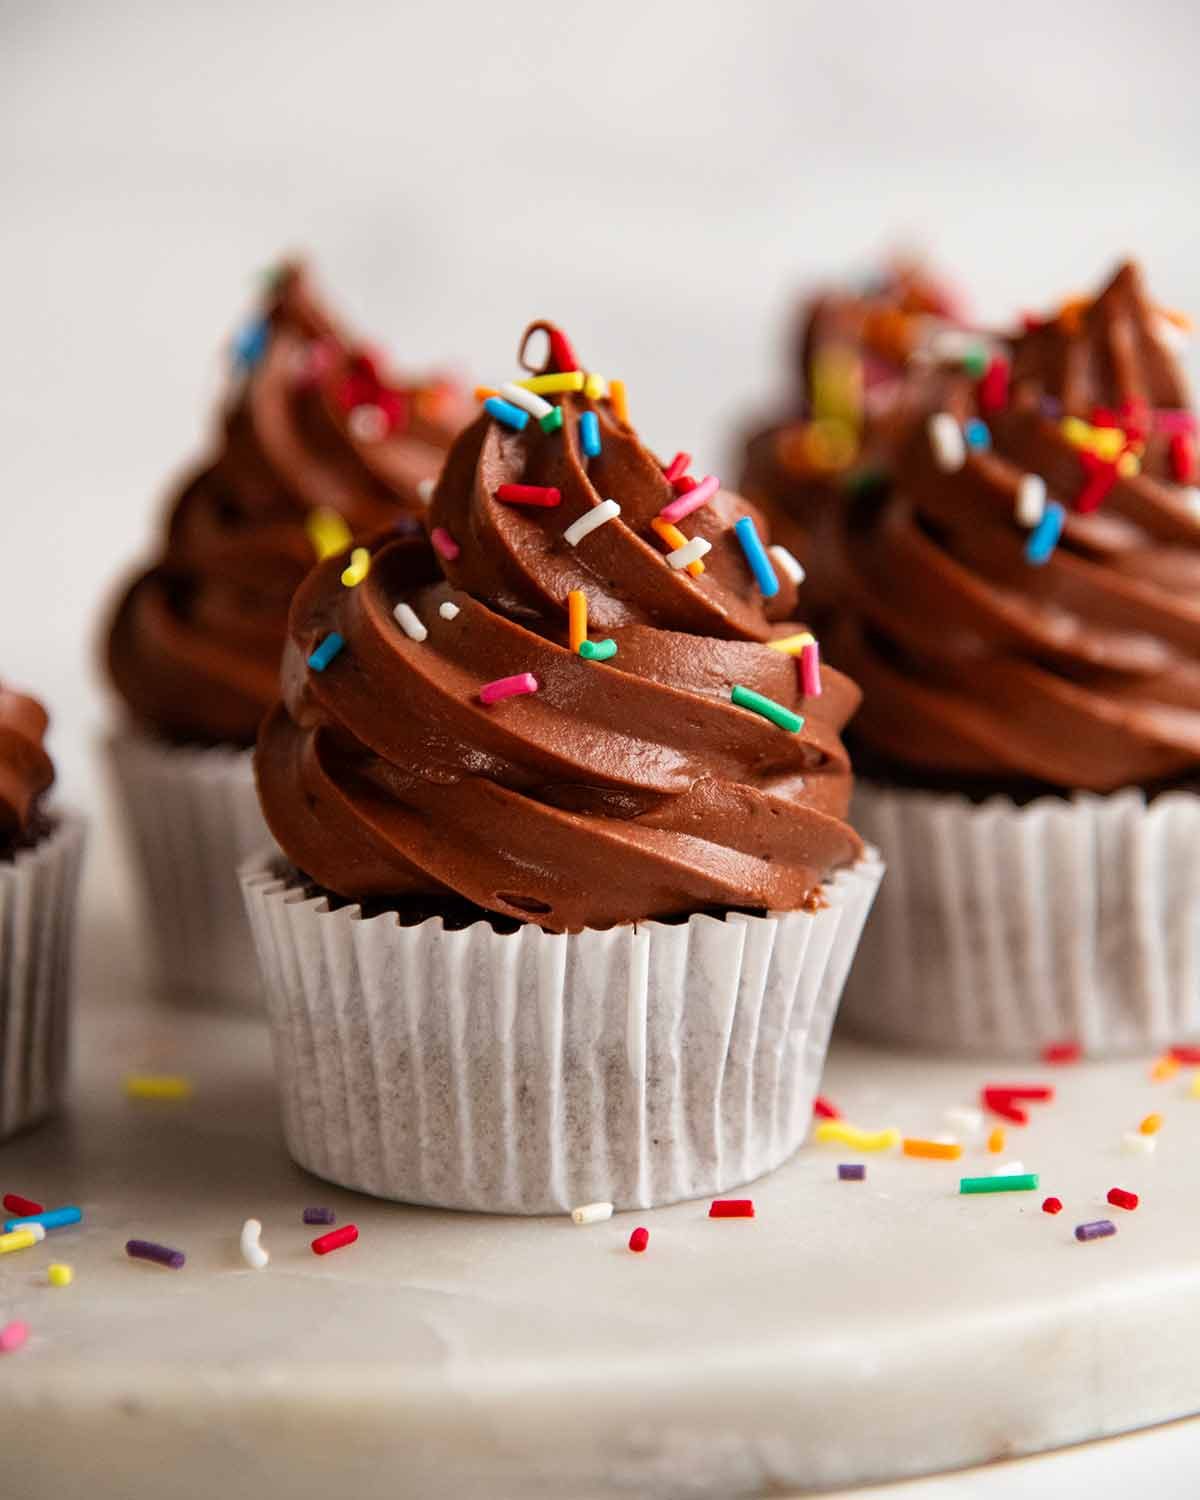
My favourite Chocolate Frosting tastes like the most delicious chocolate mousse you’ve ever had. It’s creamy and rich with chocolate flavour, but far less sweet than buttercream, so you can pipe tall swirls on cupcakes and you won’t feel ill eating it all! Pastry chefs will appreciate the crèmeux-like texture this has. Perfect for frosting, layer, piping, and to use for celebration Birthday Cakes.
This Chocolate Frosting is…
Suitable for spreading on cakes, piping tall swirls and sandwiching between cake layers.
Way less sweet and uses way less butter than buttercream – too rich to use in vast volumes.
Less rich than ganache – also too rich to use in vast volumes, like multi-layer cakes.
Has texture and flavour qualities like Swiss Meringue Buttercream but is much easier to make – no candy thermometer required.
Has a creamy, fluffy texture, but not as light as whipped cream – too light to use as a frosting.
Is completely smooth – icing sugar grit in buttercream bothers me.
Will hold its piped shape in the fridge indefinitely.
Stays creamy in the fridge – it does not harden like buttercream. Eat cake on demand!
Doesn’t get a crust on the surface when it dries.
Doesn’t use any special ingredients or equipment.
Can be made and used within a few hours – no overnight refrigeration.
Truly tastes of chocolate. Like, really!
The hunt for my Perfect Chocolate Frosting
I once did the maths to make enough buttercream frosting to fill and frost the top and sides of a 3 layer cake, and almost had a heart attack – 500g / 1 lb butter, 1kg / 2 lb icing sugar. Even if you cut 16 thin slices…. oh my…. *her arteries harden at the thought!*
Honestly, if I ate that cupcake above and it were buttercream frosting, it would make me feel ill!
So anyway, to cut a long story short – I researched and tried so, so many recipes over the past decade in pursuit of The Perfect Frosting, the ultimate all-purpose frosting that I could use for layering and piping that’s not too rich and sweet, and not fiddly to make (sorry Swiss Buttercream!). Over the past few years I settled on a recipe that was a variant of ganache (love – but, rich) and I deemed today be the day that I release it into the world.
I hope you become as obsessed with it as I have!
Ingredients you need for Chocolate Frosting
This frosting is like a cross between a whipped ganache (chocolate richness), buttercream (buttery creaminess) and cream cheese frosting (except I use cream cheese for volume and to thicken the frosting, not for tang). So if you’re familiar with those frostings, you’ll recognise all the ingredients!
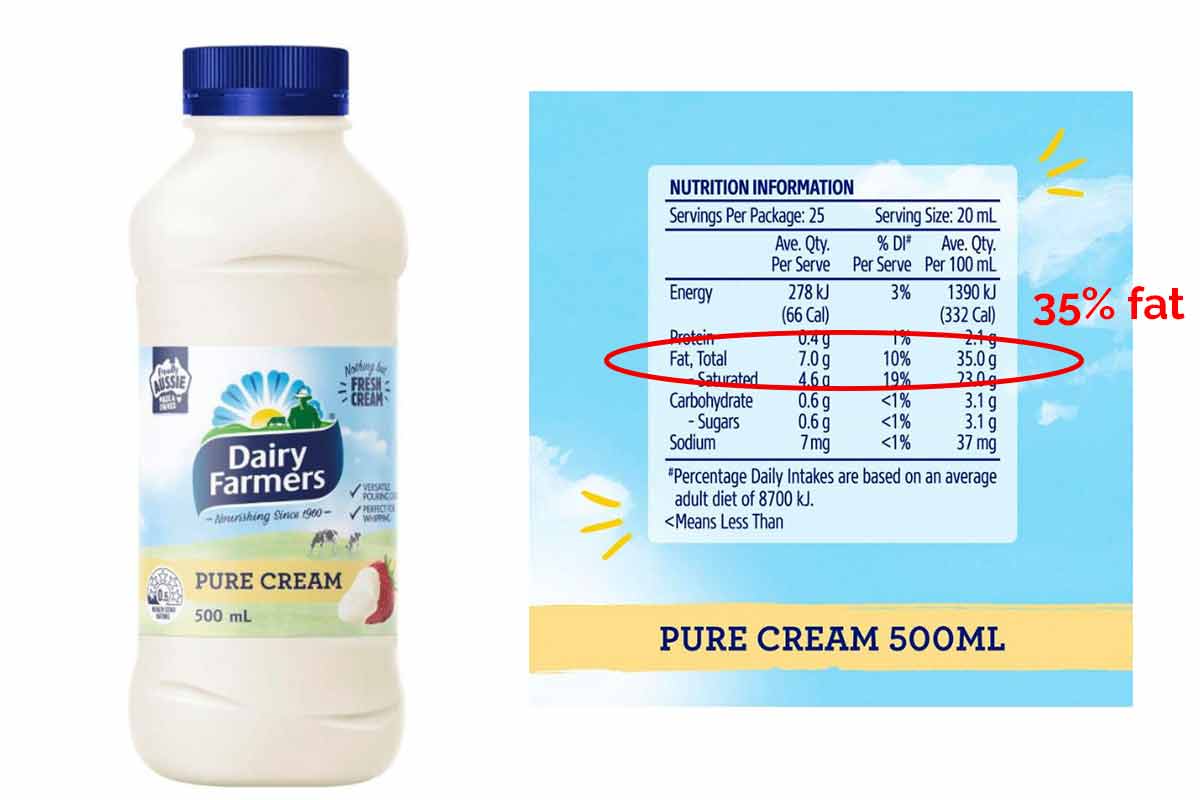
⚠️ In order for this frosting to work, you must use thickened cream / heavy cream, or a cream that can be whipped that has 35 – 40% fat (check the nutrition label). This is the minimum fat percentage required to “set” the frosting so it is stable enough to pipe.
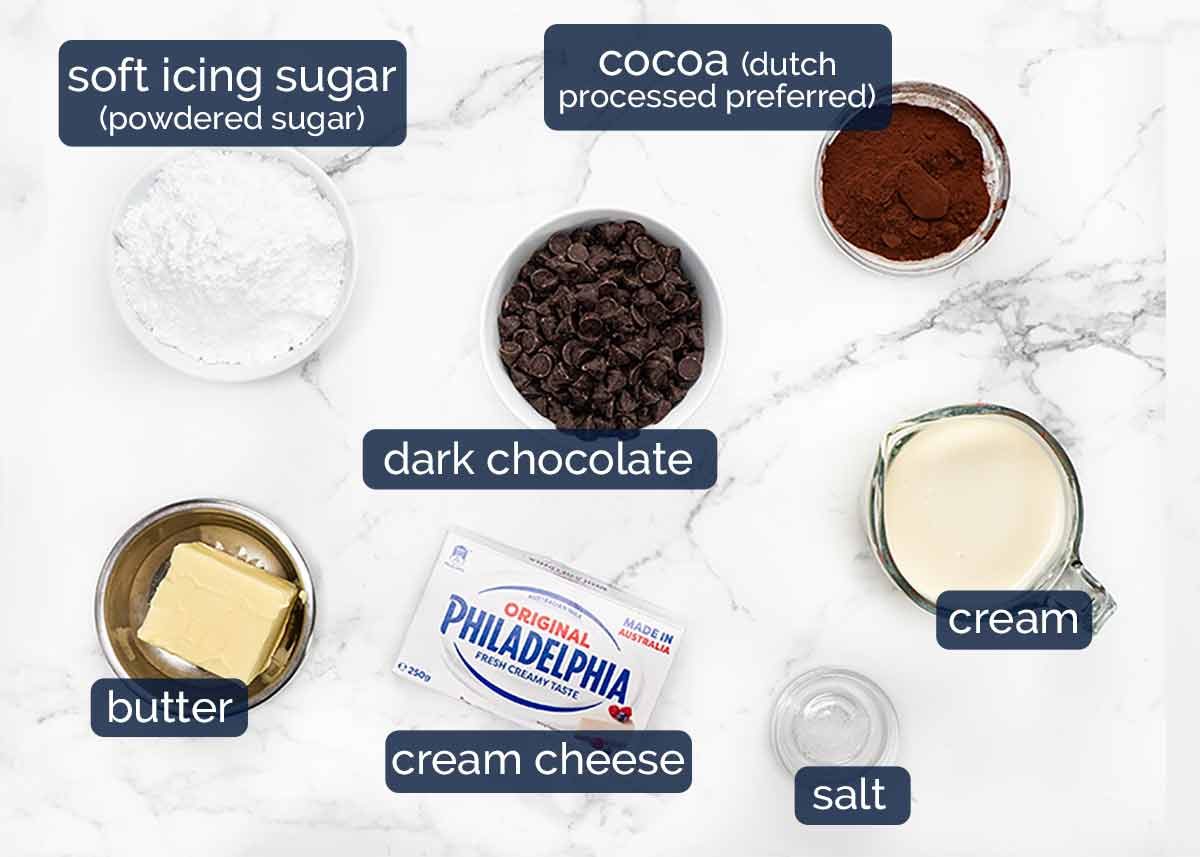
Dark chocolate – This recipe is designed for dark chocolate (US: semi-sweet) which has ~45–55% cocoa. (Australia, just use the choc chip / melts packs labelled “dark chocolate”). Be sure to use chocolate from the baking aisle, not confectionary aisle (only exception is Lindt blocks). Use chips or melts/discs for convenience, or chop up a block.
Other chocolate – Bittersweet/70% also works, giving a deeper colour and slightly firmer frosting but still beautifully creamy and spreadable. Milk and white chocolate are too soft, the frosting will be too loose.
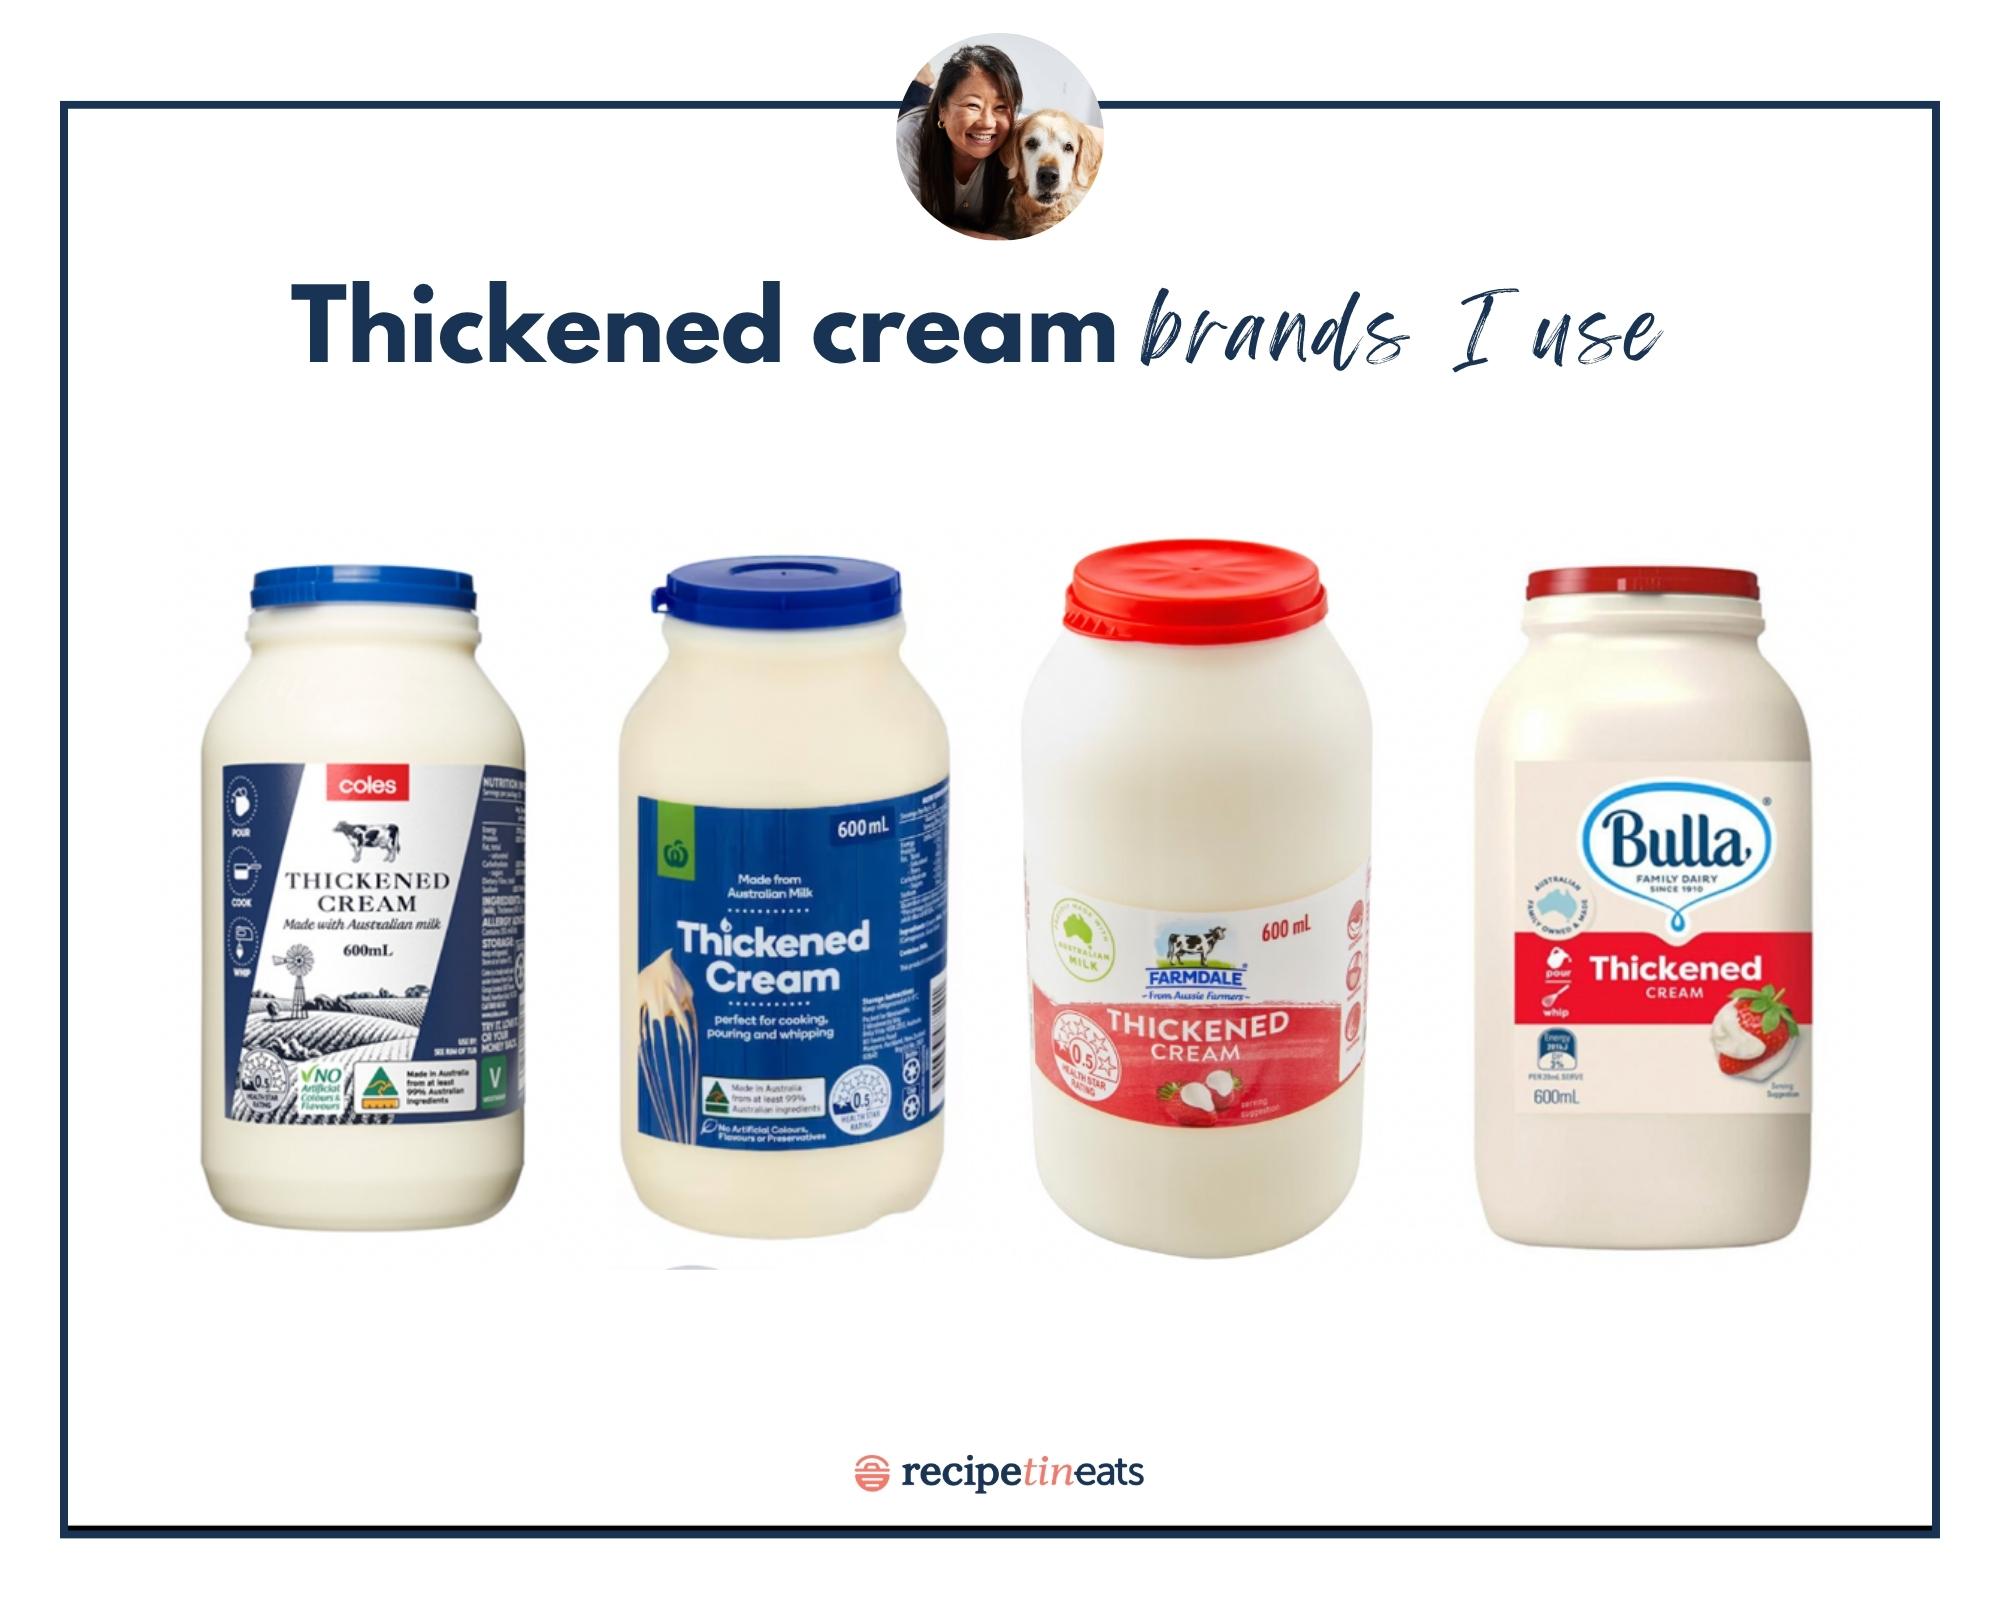
Thickened cream / heavy cream – Thickened cream / heavy cream – Use thickened cream (US: heavy cream) or any cream with 35 – 40% fat (check the label) like this Dairy Farmers one. This is essential for the ganache base to set properly before whipping into a fluffy frosting. Standard thickened cream in Australia and heavy cream in the US are both around 35% – here are the ones I use.
Do not use cooking cream, dollop cream, mascarpone or low fat cream, the frosting won’t set or whip properly.
Dutch processed cocoa powder – This has a richer chocolate flavour and is darker than regular cocoa powder. While it does make the frosting more chocolatey, I would not make a special trip just to get it, you can use regular unsweetened cocoa power instead. The frosting will be a little paler but will still have terrific chocolate flavour.
Unsalted butter – I only use 100g / 7 tbsp butter in this frosting, a tiny amount compared to buttercream. It adds a bit of richness to the frosting so it’s not too fluffy and aerated like whipped cream. Make sure it is softened to room temperature so it whips up easily.
Soft icing sugar (powdered sugar) – This is used to add a little sweetness to the frosting. We only use 2 cups (250g) which is significantly less than the 1kg / 8 cups that would be used if we were making the same volume of buttercream frosting.
🇦🇺 In Australia, use soft icing sugar, not pure icing sugar (that one’s for things like royal icing, which sets hard).
Cream cheese – This is used to create a volume in the frosting (rather than using more butter) as well as stability (by thickening and holding its shape) and creating a lovely creamy texture. Unlike cream cheese frosting, this frosting does not taste tangy at all, that is not the purpose of cream cheese here.
Use block cream cheese, not the spreadable kind that comes in tubs (it’s too soft). If spreadable is all you can get, just be aware that the frosting will be a little softer so while fine for spreading, it’s not as stable for piping tall swirls. You can thicken the frosting using extra icing sugar – just beat it in at the end.
How to make My Favourite Chocolate Frosting
This frosting takes a few more steps than a basic “chuck it all in a bowl and beat, beat, beat” buttercream. But it’s easy – and the end result is so superior, it’s worth it!
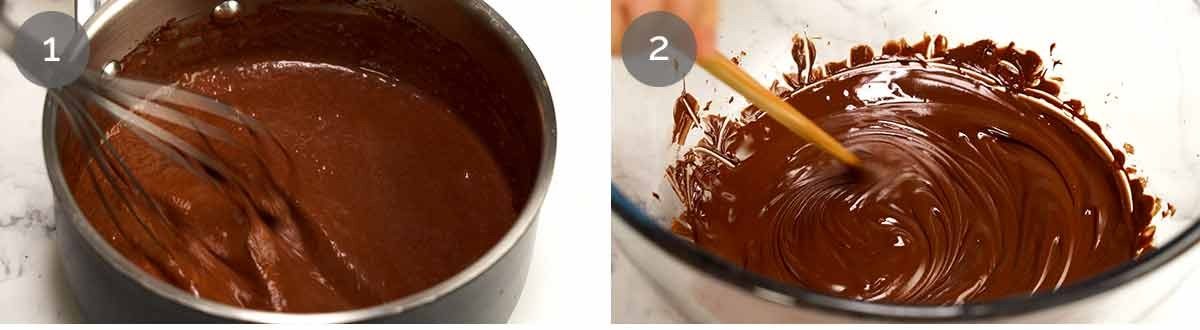
Bloom cocoa – Heat the cream until hot but don’t let it boil (it can split). Whisk in the cocoa powder until lump free – it will be like a thin paste. Then leave it for 5 minutes to let the cocoa bloom.
ℹ️ Blooming means bringing out the chocolate flavour and hydrating the cocoa to smooth out any graininess. You’ll never get the same amount of chocolate flavour just by beating cocoa powder straight into frosting.
ℹ️ There is no need to sift the cocoa, lumps will whisk out. And any residual lumps will disappear when you beat the frosting.Melt chocolate – Place the chocolate chips in a heatproof bowl and melt in the microwave in bursts until smooth – 30 seconds on high, stir, then 20 second increments.
ℹ️ The reason we melt the chocolate separately from the cream rather than using hot cream to melt the chocolate (like traditional ganache) is because there is a lower ratio of cream to chocolate. Also, the cream is thickened from the cocoa. I did try using the hot cocoa cream to melt the chocolate and ended up with pesky little lumps.
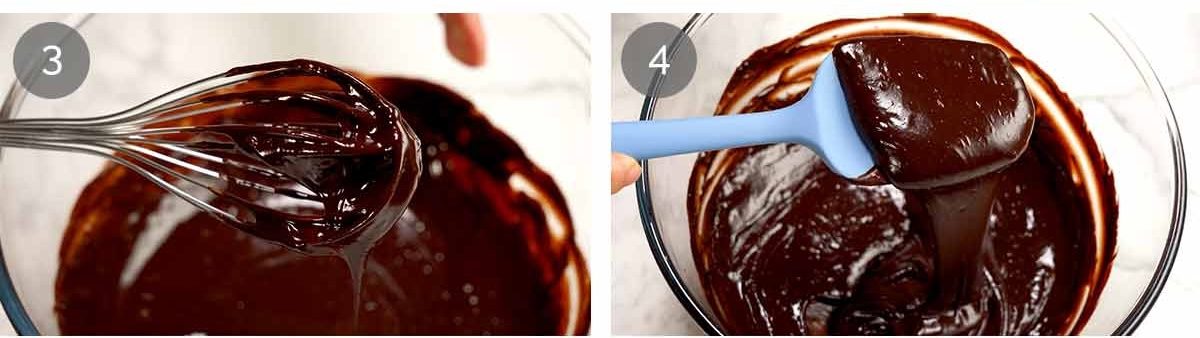
Chocolate paste – Whisk the cocoa paste into the melted chocolate until it’s lump free. The mixture may get a little stiff at first before they combine and loosen.
Cool for 15 minutes on the counter – it will thicken. Don’t worry if a skin forms on the surface, it will beat out in the next step.
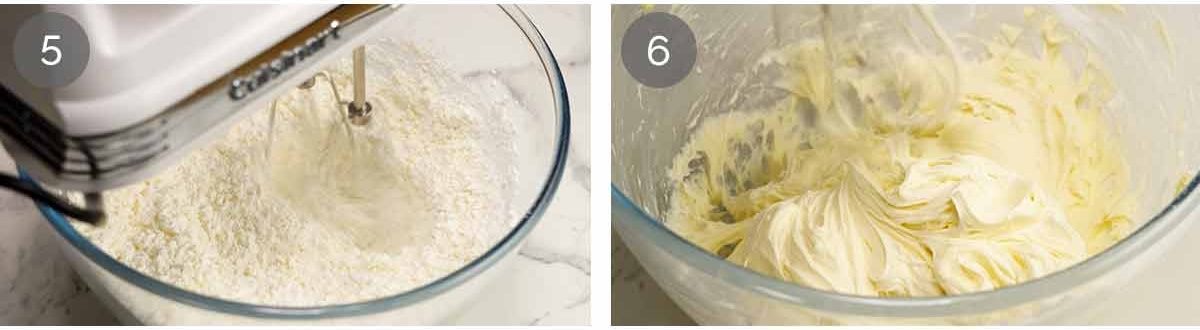
Cream butter – In a separate large bowl, beat butter with a handheld mixer until soft and fluffy (about 1 1/2 minutes on high). Add icing sugar and beat – it will become sandy because of the small amount of butter we’re using. Beat it until no large chunks of butter remain (~ 30 seconds).
Cream cheese whip – Then add the cream cheese and beat until the sandy bits incorporate into the cream cheese and becomes a smooth mixture, about ~30 seconds on high. Stop beating once the mixture is smooth, don’t try to aerate at this stage (the cream cheese gets loose).
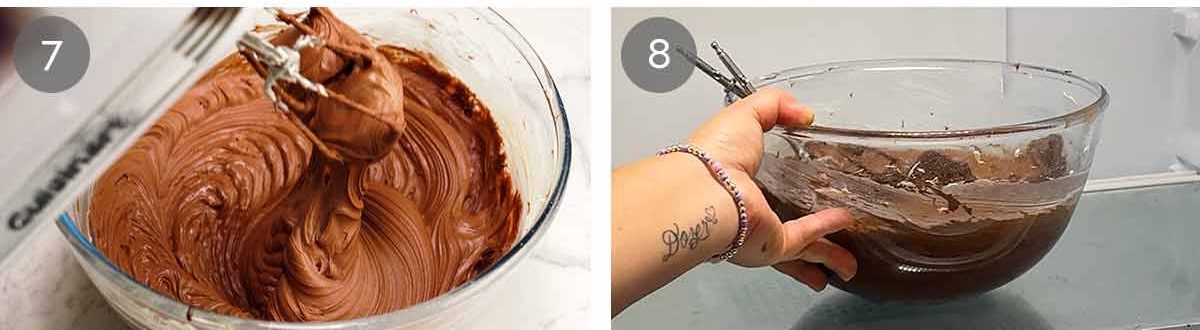
Beat in chocolate – Add all the cooled chocolate paste and beat until combined.
Refrigerate 2 hours – Cover the bowl with cling wrap and refrigerate for 2 hours until properly fridge-cold (stick the beaters in the bowl). You can leave it in the fridge at this point for as long as you want, limited only by the expiration date of your cream.
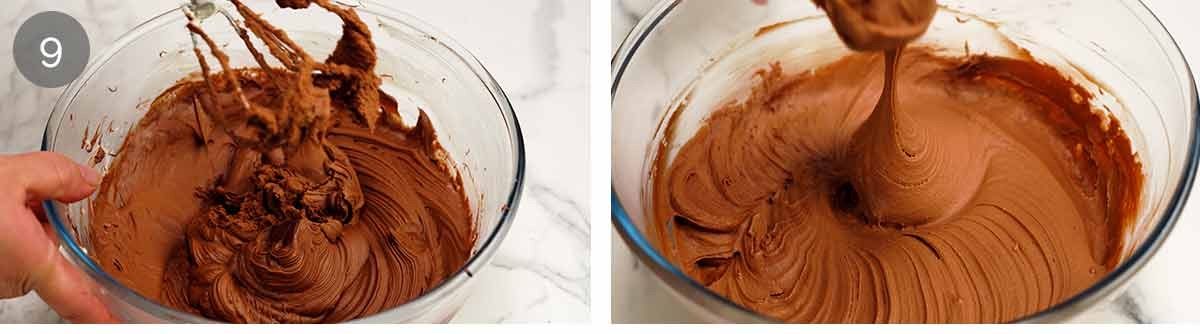
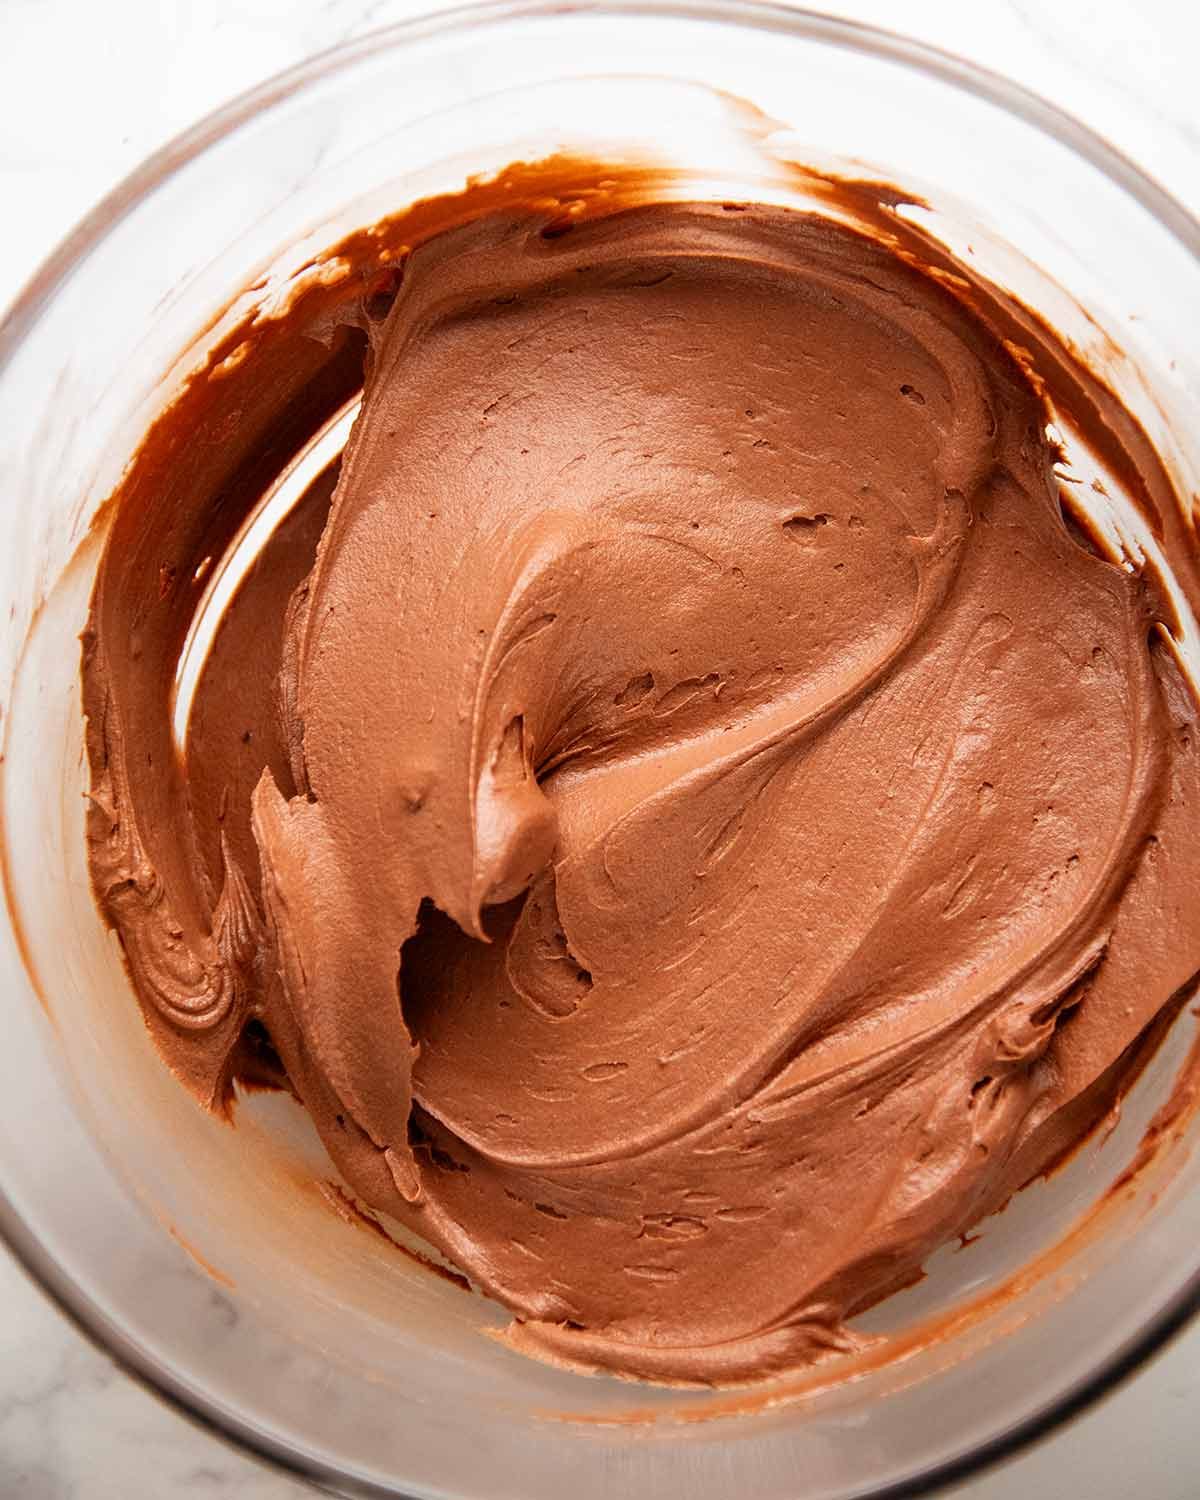
Fluff frosting – Remove bowl from the fridge and pour in the cold cream. This extra bit of cream helps aerate the frosting to create volume. Beat on high for 1 1/2 minutes or until you have stiff peaks (ie upright Santa hats, not floppy elf hat). The frosting should be beautifully creamy like buttercream but also fluffy like whipped cream – better taste test to check!
The colour will be paler than the final colour after the frosting sets – it darkens by a few shades.
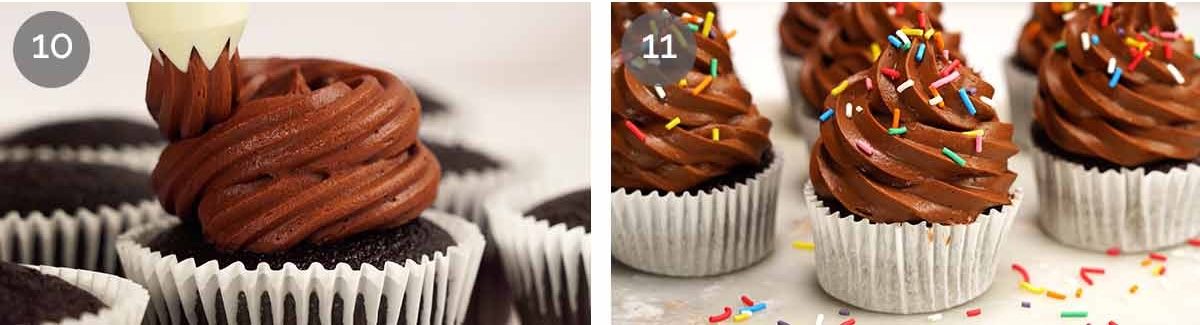
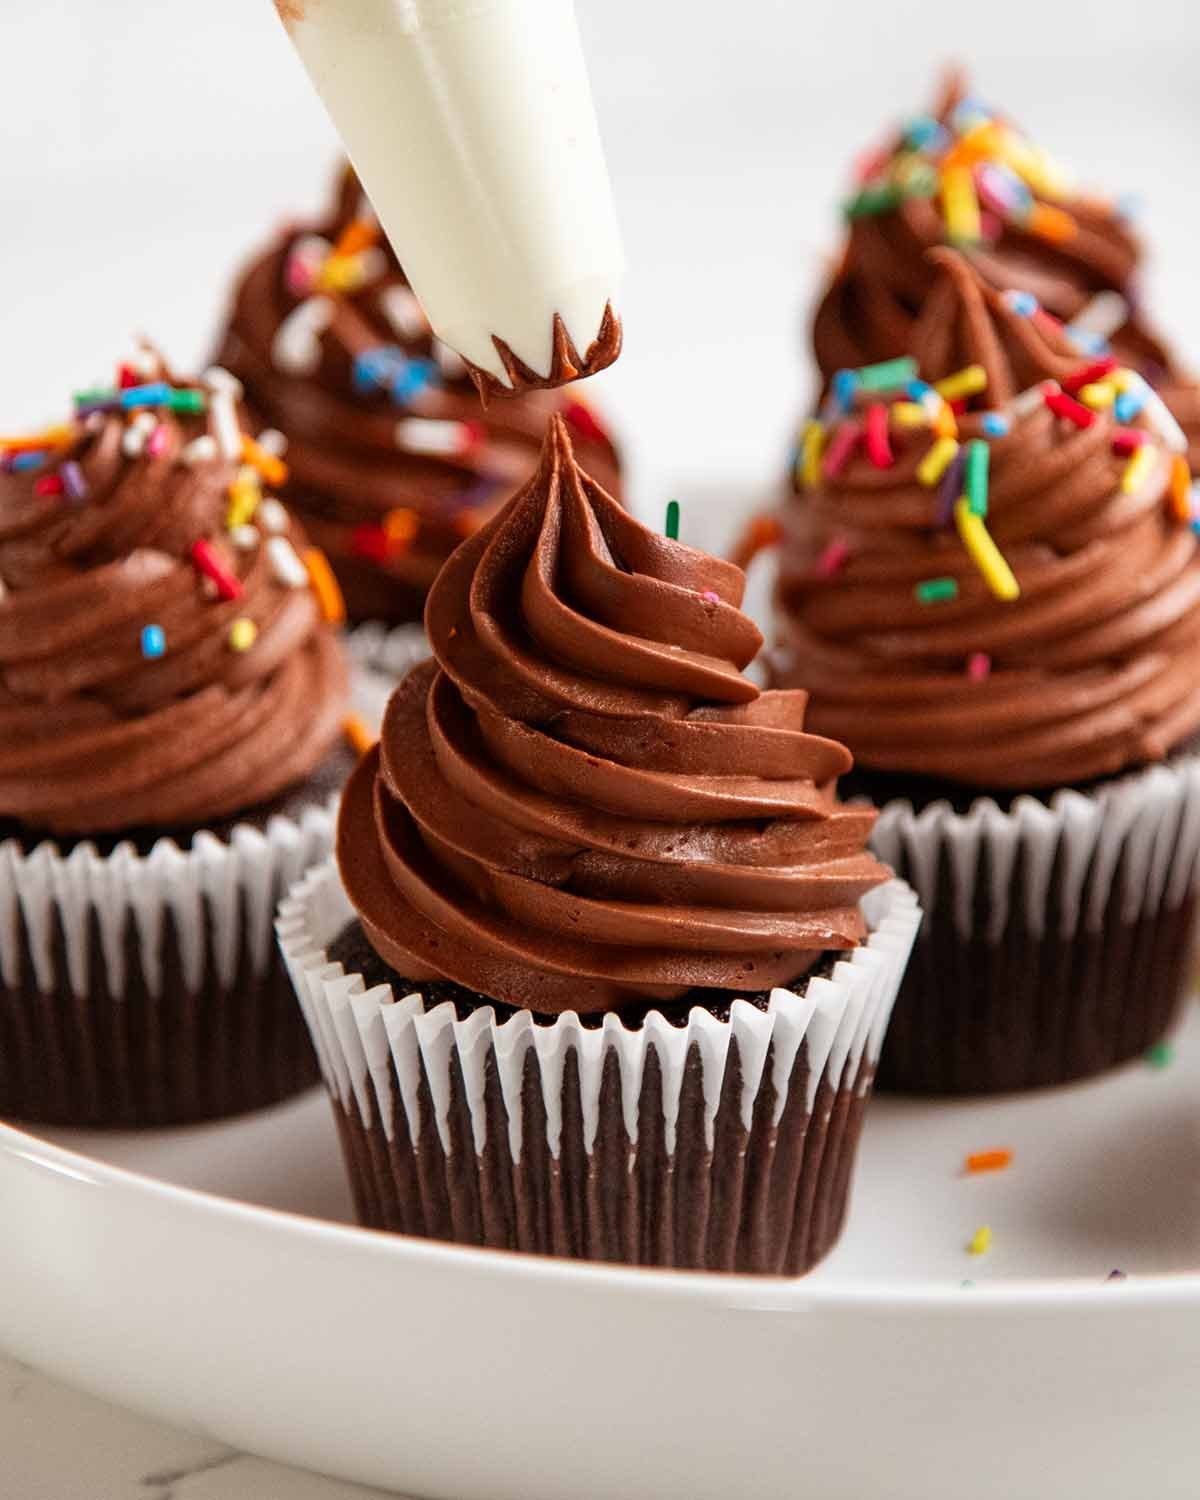
Frost –Use the frosting immediately. Spread it on cakes and cookies, sandwich it between layers, and transfer to a piping bag to pipe tall swirls on cupcakes.
Refrigerate 30 minutes – You can serve it straight away but it’s better to refrigerate for 30 minutes to let the frosting set. This is especially the case for tall swirls on cupcakes, or layer cakes. Refrigerating will stabilise the frosting a bit so the swirls are more stable, and it’s easier to cut clean slices.

What to use this chocolate frosting for
Anything you want to spread or pipe with chocolate frosting! here are some ideas:
Cupcakes – chocolate or vanilla, or any other flavour that goes with cupcakes
Brownies – take them over the top by smothering with this frosting!
Cookie sandwiches – great way to use up leftover frosting, just spread between cookies and sandwich together. Try it with my best Chocolate Chip Cookies (or these easy ones, if you need them immediately), these outrageous Triple Chocolate Cookies or your favourite cookie in my cookie collection!
As pudding – Spoon into little glass dishes, shake/spread to level out then refrigerate to set a bit. Serve with a dollop of whipped cream and it will be just like Chocolate Pudding Pots! This is a great way to use up a bit of leftover frosting.

Yep. This one makes me nervous.
So there you have it. My Favourite Chocolate Frosting.
I always get a bit nervous sending my “inventions” out into the world, especially ones like this that I’ve made up purely to match what I want in a frosting. Part of me can just hear pastry chefs clutching their whisks, muttering that I should’ve made a proper chocolate crèmeux instead, or that ganache should be left alone as just chocolate and cream, not “messed with” using cream cheese.
And look, I get it. There are classic techniques for a reason. But I also know I don’t always want to deal with six leftover egg whites, or something that’s as rich as ganache when all I want is a frosting that tastes amazing, pipes beautifully, and is actually nice to eat in generous amounts.
Still, every time I share something like this, there’s that little voice wondering if I’ve gone too rogue.
So I’d really love to hear what you think. If you give it a go, tell me – are you team “keep it classic”, or team “if it works and tastes this good, who cares”? 🙂 – Nagi x
Watch how to make it
Hungry for more? Subscribe to my newsletter and follow along on Facebook, Pinterest and Instagram for all of the latest updates.

My Favourite Chocolate Frosting
Ingredients
Chocolate base:
- 200 g / 7 oz dark chocolate chips or melts (semi-sweet chocolate chips), or chopped block (Note 2)
- 3/4 cup thickened cream / heavy cream , or other whipping cream 35 – 40% fat (Note 3)
- 1/4 cup dutch processed cocoa powder (no need to sift), or regular unsweetened cocoa powder (Note 4)
Chocolate frosting:
- 100 g / 7 tbsp unsalted butter , softened (or use salted and skip salt)
- 250 g soft icing sugar / powdered sugar , sifted (Note 5)
- 250 g / 8 oz Philadelphia cream cheese block (not tub), at room temperature (Note 6)
- 1/2 cup thickened cream / heavy cream , fridge cold
- 1/4 tsp cooking salt / kosher salt (halve for table salt, +50% for flakes)
Instructions
ABBREVIATED RECIPE
- Bloom cocoa with cream for 5 min. Melt chocolate, mix with bloomed cocoa, cool 15 minutes. Beat butter, then icing sugar (goes sandy), then cream cheese until smooth. Beat in chocolate. Chill 2 hrs. Add cream, whip to stiff peaks. Use immediately to frost or pipe.
FULL RECIPE
- Bloom cocoa – Heat the cream in a heatproof bowl until hot but make sure it doesn't come to a boil. Add cocoa powder and whisk until lump free – it will be like a thin paste. Set aside 5 minutes to bloom (brings out chocolate flavour).
- Melt chocolate – Place the chocolate chips in a heatproof bowl and melt in the microwave in bursts until smooth – 30 seconds on high, stir, then 20 second increments.
- Chocolate paste – Add the cocoa paste into the melted chocolate. Whisk until combined and smooth, it will be like a thin paste. Cool for 15 minutes on the counter – it will thicken. Don't worry if a skin forms on the surface, it will beat out in the next step.
- Cream cheese whip – In a separate large bowl, beat butter with a handheld mixer until soft and fluffy (about 1 1/2 minutes on high). Add icing sugar and beat until it resembles wet sand (~ 30 seconds). Add cream cheese and beat until smooth and creamy (~30 seconds), stopping once no yellow butter bits remain.
- Beat in chocolate – Add all the chocolate paste and beat until combined.
- Refrigerate – Cover the bowl with cling wrap and refrigerate for 2 hours until properly fridge-cold (stick the beaters in the bowl). This gives the frosting structure. You can leave it in the fridge at this point for days.
- Fluff frosting – Remove bowl from the fridge. Add cream and salt. Beat on high for 1 1/2 minutes or until you have stiff peaks (ie upright Santa hats, not floppy elf hat). The frosting should be beautifully creamy like buttercream but also fluffy like whipped cream – better taste test to check! It will be a little pale – it darkens once piped/spread.
- Frost – Use immediately to frost cakes and pipe onto cupcakes – spread with knife/offset spatula or transfer into piping bag. (Note 6 on thickness) Ideally, refrigerate frosted cakes for at least 30 minutes to let the frosting set before serving.
Holding and serving notes
- Once set, the frosting will hold its shape in the fridge and will not deflate. It does not harden in the fridge so can be enjoyed fridge cold, though I personally prefer my cakes at room temperature. When out of the fridge, keep it out of the sun – the frosting melts more easily than buttercream, but is much more stable than whipped cream.
Recipe Notes:
1. Frosting amounts required – Recipe makes enough to frost:
- 3 or 4 layer 20 – 23cm / 8 – 9″ cake – top, sides, layers plus leftover for piping decorations
- 2 x 23 x 33cm / 9 x 13 slab cakes (top)
- Tall swirl frosting on 15 cupcakes (5-6cm / 2 – 2.4″ high, 80g/2.8oz frosting on each)
- Medium swirls for 20 cupcakes (3 – 4cm / 2.2-2.4″, 50 – 60g / 2oz each)
- Spread on thickly – 30 cupcakes.
- 2 layer 20 – 23cm / 8 – 9″ cake (top, sides, layer inside), scale recipe down to 4 cups (click on servings and slide down).
- Just the top of a single layer 20 – 23cm / 8-9″ – halve the recipe
Remembering Dozer
One of the more torturous shoots he attended – a big table of baked goods for the Sweets chapter of my cookbook!

This was the final photo. It’s a cracking shot (thanks to Rob Palmer, one of Australia’s greatest food photographers), but slight issue ……. the FOOD is in focus, not Dozer. Priorities questionable!! 🤣

great recipe! light, delicious, and well worth the effort 🙂
Wow! I made my boyfriend a dark chocolate cake and this was perfect!
Note: If you add the cream and the chocolate paste and *GASP* it looks completely broken..like an oily brownie batter…don’t worry! I put it in the food processor to re-emulsify and it came out great. No issues at all
Utterly awesome & delicious! I really appreciated the huge reductions in sugar and butter. Would this work with reduced fat cream cheese? Incredible work yet again 👍
Hi Nagi. I love the sound of this icing but not sure if this one will be my best choice or whether to stick with buttercream. I’m making a dinosaur landscape cake so need an icing to stick layers together to make mountains and cover the top for dirt/mud. Will need to make some buttercream to do blue for waterfall and green for grass etc. I’ll be making it the night before for midday birthday party. Probably won’t fit in the fridge overnight but living in Tassie in winter my garage is pretty cold overnight and has been fine the last couple years. Will this icing keep okay for this timeframe? Or should I just buttercream the whole lot. Thanks
Hi Sophie! This frosting will absolutely be fine left outside in Tassie winter 🙂 I only refrigerate in the warmer months. I always prefer keeping cakes at room temperature when I can, it is just so much nicer! – N x
Nagi’s favourite chocolate frosting is now and forever my favourite chocolate frosting, the only problem I have is stopping myself from eating it by the scoopful.
Perfection, it was hard not to eat half the mixture before putting it in the fridge!!
I don’t have a hand held electric mixer, can I use my Thermomix to whip the cream cheese?
I saw this recipe on the day I needed to make my daughter’s birthday cake – perfect timing!!
Wow wow wow wow…it is like the perfect chocolate mousse but frosting and I could not get enough of it. Turned my standard chocolate cake into something super special.
Thank you again, Nagi, your recipes never fail me xo
I know better than to mess with the master, but I really needed to find a way to make this vanilla for a non-chocolate lover. And it worked!
I followed the recipe as per Nagi’s instructions – using 1/2tbs of instant vanilla pudding mix in place of the cocoa powder, and white baking chocolate in place of the dark chocolate.
It was amazing, and while not as wow as the chocolate, it was far and away the best vanilla / white chocolate frosting I’ve ever had!
Nagi’s favourite chocolate frosting is now my favourite chocolate frosting! Tastes superb, definitely like a thick/heavy mousse, not too sweet. It’s super easy to pipe and spread. More fiddly than straight buttercream but so worth the extra effort. This will absolutely be my new “go to” for anything that needs chocolate frosting. Thanks Nagi.
I made this icing for my daughter-in-laws birthday cake this weekend. It is exactly as Nagi described… a little like chocolate mousse. It was so divine!! Thank you 👌
Nagi, you published this on my daughter’s birthday – just in time for her party! This icing recipe is out of this world incredible! I could eat the entire bowl myself!
It pairs absolutely perfectly with your chocolate cake recipe. This will be my magic combo every year from now on!
Can I make this frosting and frost a cake and then put it in the refrigerator overnight and serve it the next day?
Yes! That is one of the great things about this frosting – unlike buttercream which goes rock hard in the fridge, this does not. It stays creamy but still holds its form!
Just made this and it’s delicious! Best icing ever, Thanks Nagi!
YEEE HAAA!!!! I’m so glad you loved it Gemma!!! – N xx
This frosting sounds like the perfect balance rich and chocolatey without being overly sweet.
That’s what I was going for! 🙂 Hope you get a chance to try it – N x
Hi Nagi, thankyou for this recipe. The amount of icing sugar in some frosting recipes scares me 😅 so I’m very keen to give this one a try! Would love to see a white choc and caramel version too!
I KNOW right!! I calculated that you need 1 kg of icing sugar to make enough buttercream for a 3 layer cake – OMG that is SO much sugar!!! White chocolate should be fairly easy, I will share that one soon as I’d like a white frosting myself 🙂 – Nx
Hi Nagi, thankyou for this recipe. The amount of icing sugar in frosting recipes always scares me 😅, so I’m very keen to try this one. Would love to see a white choc and caramel version too!
I more like this picture of you and Dozer on Dozer beautiful dog (why not handsome dog?😜) than the previous one💖
And thank you Nagi, but I just a bit confuse with note here, Dark chocolate (note 1) but actually on note 2, Heavy cream (note 2) Cocoa powder (note 3) on note 3, 4 and Soft icing sugar, Cream cheese (note 4) but there is no note for icing sugar and note 5 for cream cheese, not a big deal, its just a bit for me anyway💗🤗
Hi Nagi, thank you so much for this icing recipe, it looks delicious! I was wondering if using lactose free cream and lactose free cream cheese would be ok if they are the same fat percentages? This looks like the perfect icing! 🧁
Hi Emily! As long as the cream has the right fat % AND it can be whipped, I can’t see why this would not work. The worst case would be that it’s not quite stiff enough to pipe tall swirls like the cupcakes pictured, but it’ll still be a creamy lovely frosting that’s spreadable. 🙂 – N xx
Thank you for sharing all your new things with us! And thank you too for not wanting to be wasteful. I don’t like it either when I end up with a partial of anything to try to figure out what to do with it! Your recipes are always wonderful and successful! Can’t wait to have an occasion to try this out!
Thanks for the lovely message Nancy! Hope you get a chance to try this 🙂 – N x
I haven’t tried this yet (will in the next day or two); I’m sure it will be as fabulous as all your recipes I’ve tried! You’re my first stop when looking for something specific or inspiration.
My deep condolences on your lovely Dozer; even at a distance, I’ve appreciated his presence in the world.
Thank you Athena 🙂 Hope you do get a chance to try this! I really love this frosting so much. – N x
Oh my! This frosting is the best I’ve ever made and tasted!! I couldn’t stop dipping a spoon in and I will 100% be eating the leftovers tomorrow.
It was so easy to work with on a number 6 motorbike track cake for our birthday boy.
Thank you for always being my go to recipe guide and making me look like I know how to bake!
OMG! I think you are the first person in the world to make it!!! I’m so so glad you loved it Emily, thanks for letting me know! – N xx